This post and photos may contain Amazon or other affiliate links. If you purchase something through any link, I may receive a small commission at no extra charge to you. Any supplies used may be given to me free of charge, however, all projects and opinions are my own.
Do you have a Sawgrass Printer and want to learn more about the Sawgrass Print Manager? Today I’m going to go in-depth into the print manager itself and teach you everything you can do inside of it some tips and tricks for using it.
Are you still trying to decide which sublimation printer is right for you? Check out my Sawgrass Sublimation Printer start guide here.
Sawgrass Print Manager
If you really want to see how to use the Sawgrass Print Manager I recommend you watch the video I have on it. Seeing the different screens and the flow of the program will be really helpful for you. Just click play on the video below:
What is the Sawgrass Print Manager?
Sawgrass Print Manager is a program that comes with the purchase of a Sawgrass printer and it allows you to print straight to the Sawgrass printer without using another program.
You can also use any program on your computer to print to your Sawgrass sublimation printer. This means you can print without being online so you don’t have to have an internet connection to print to your Sawgrass printer.
Where Do You Find Sawgrass Print Manager?
When you set up your Sawgrass printer and install the programs to use with it, you’ll have three programs on your desktop. You’ll have Sawgrass Print Manager, Creative Studio, and a Sawgrass Smart folder. Do not remove the Sawgrass Smart folder. Just leave it on your desktop at all times.
I will be covering Sawgrass Print Manger in this post. I’ll have another post covering Creative Studio.
How to Open Sawgrass Print Manager?
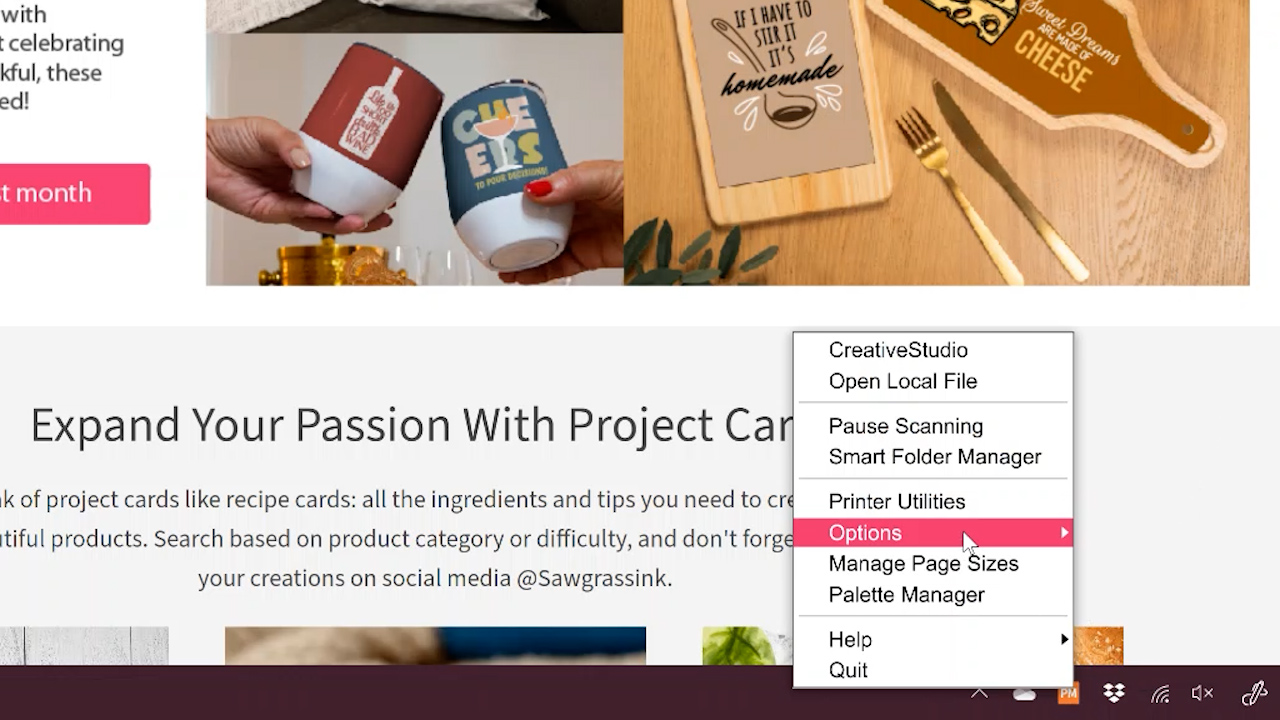
When you double click the icon for print manager on your desktop, the application will open in your toolbar. Then you would just need to right click in order to get the options for opening the application. There are a variety of options on this menu and we will look at several of those below.
How to Print from Sawgrass Print Manager
Now that we know where to find the Print Manager let’s dig deeper into what you can do with it.
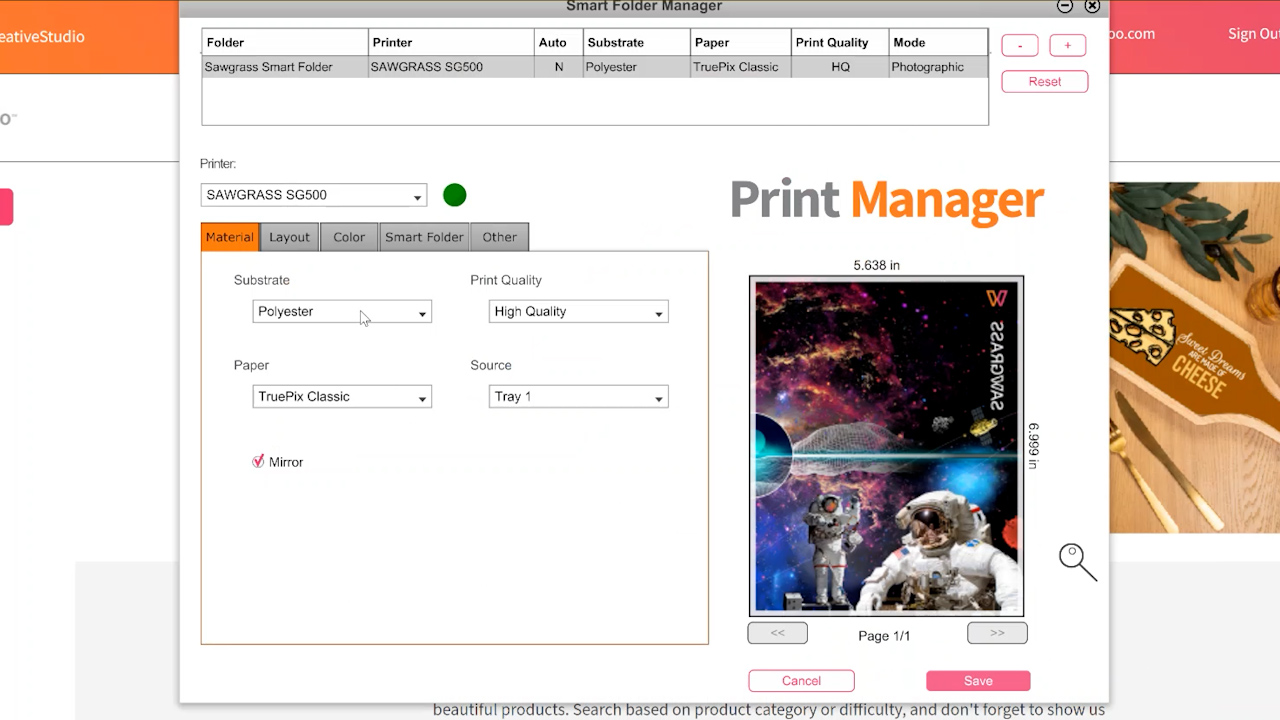
Using Smart Folder Manager to Change Print Settings
You can change the default printer settings by opening Smart Folder Manager. Any changes you make here will change your defaults. So, if you almost always press to polyester, it would be a good idea to choose that here so it always pulls up for you when you go to print.
I am typically printing images to apply to polyester so I have my default set to polyester. If you always use EasySubli then you could change that so you don’t have to adjust it every time.
The print settings on a Sawgrass printer are mainly choosing which substrate you are putting your print on. The remainder of the settings are picked for you. You can make other changes if you wish but I have found that is not necessary.
Something you should never change is where the Smart Folder is located. Mine is on my desktop and I’m just going to leave it there.
Opening File to Print
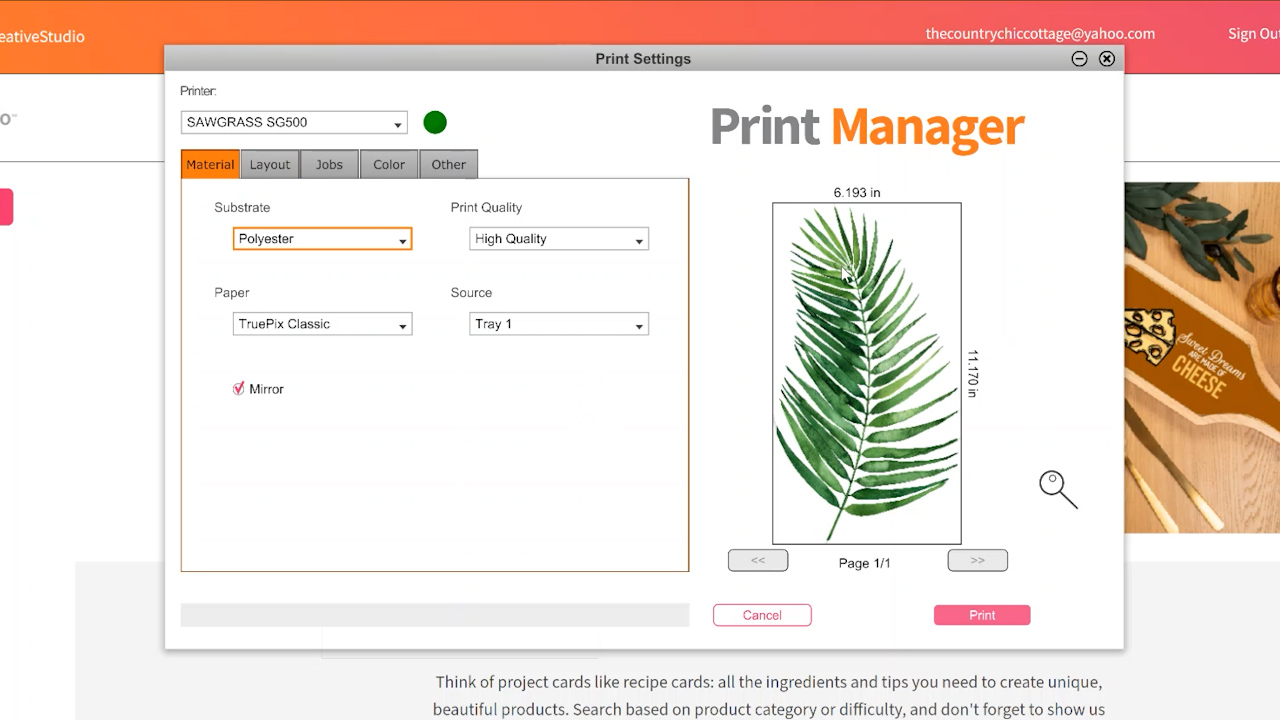
If you wanted to print directly out of Print Manager click Open Local File, find the file that you want to print, and click open. From here, we have several options.
First of all, you want to pick the substrate that you’re putting it on. For example, if I’m going to put an image on a set of polyester socks, I’m going to select polyester. Pick the option here that’s closest to what you’re using.
Print Quality should be high-quality paper. While you can use any sublimation paper in your Sawgrass printer, TruePix Classic is the Sawgrass sublimation paper so just keep it on that setting. For Source, you’ll select the tray your sublimation paper is in.
With sublimation you always need to mirror your design. So leave that box checked.
Changing the Layout in Print Manager
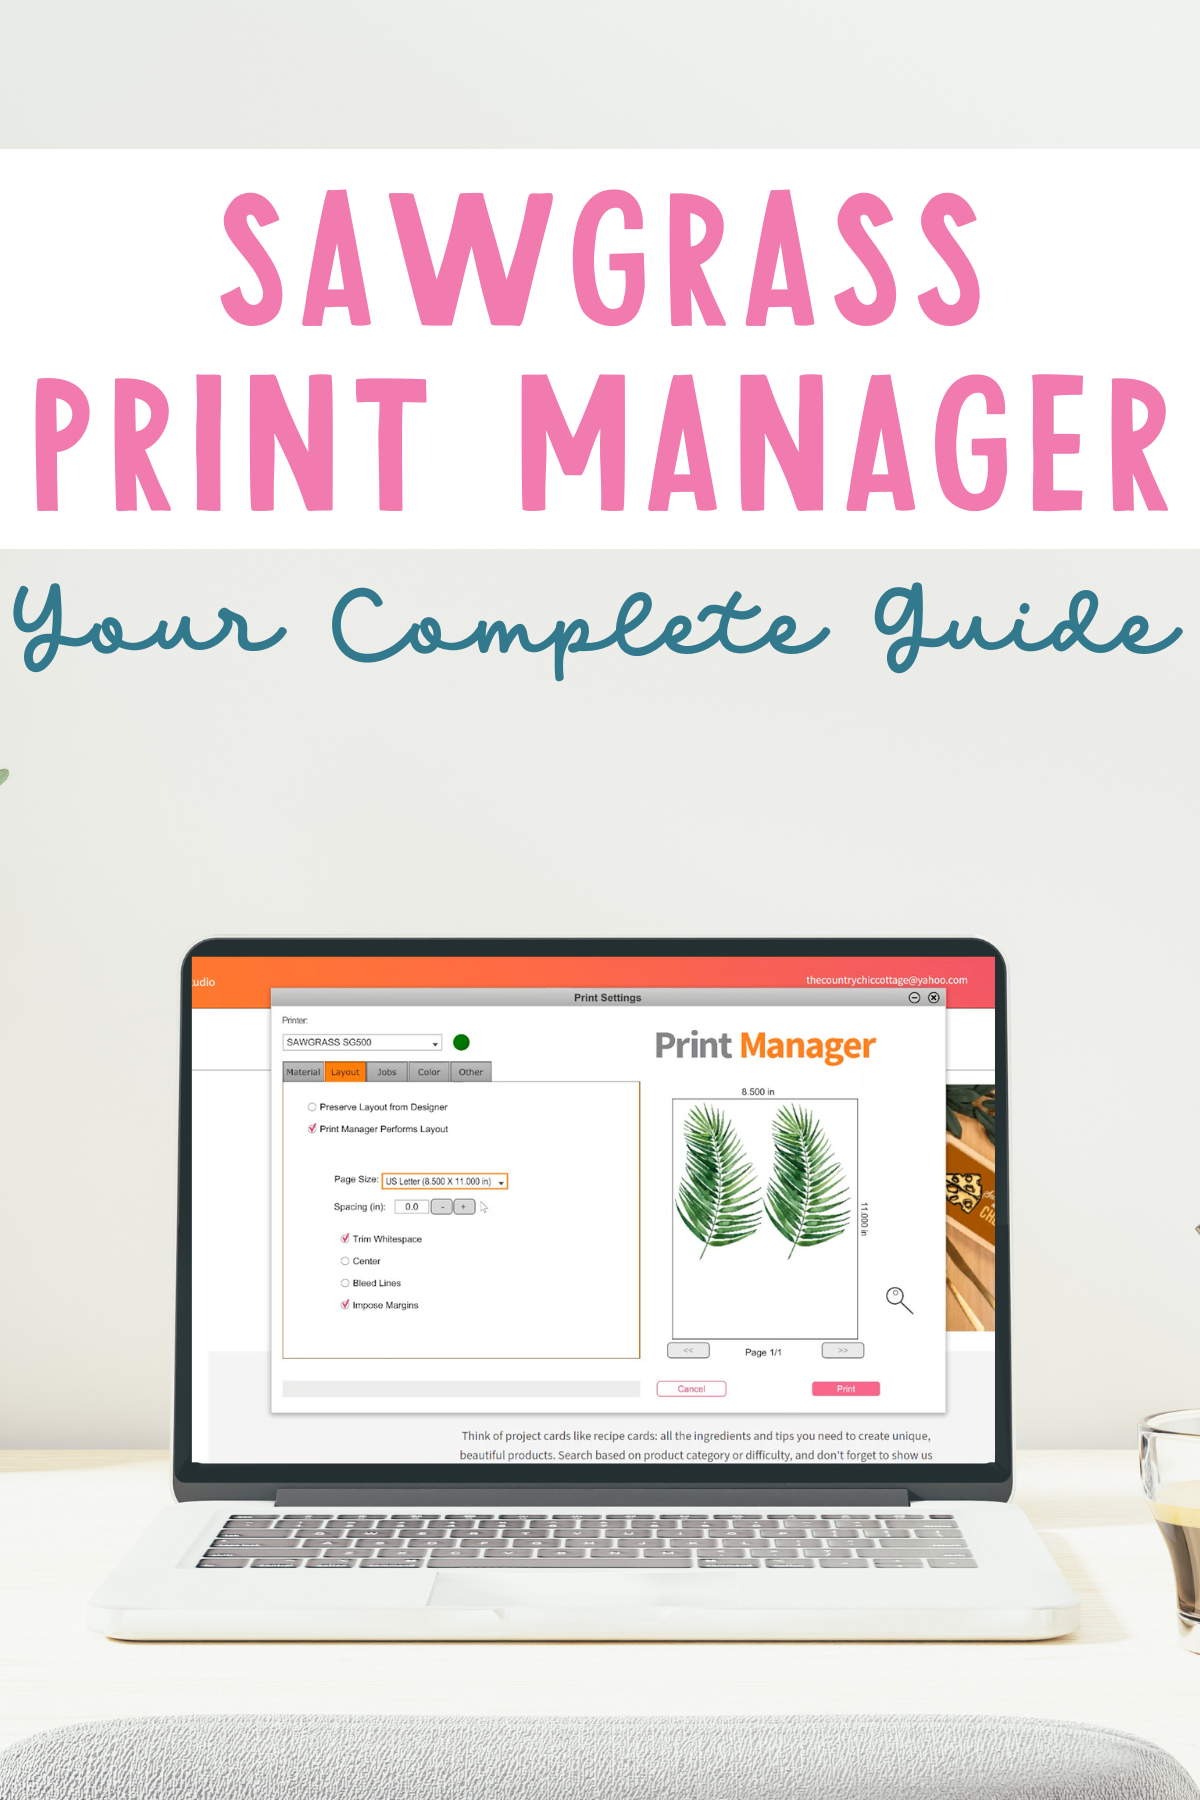
From the Layout tab, check the box that says “Print Manager Performs Layout”. If you are using another program like Creative Studio or Photoshop to layout your design you could use the “Preserve Layout from Designer” option.
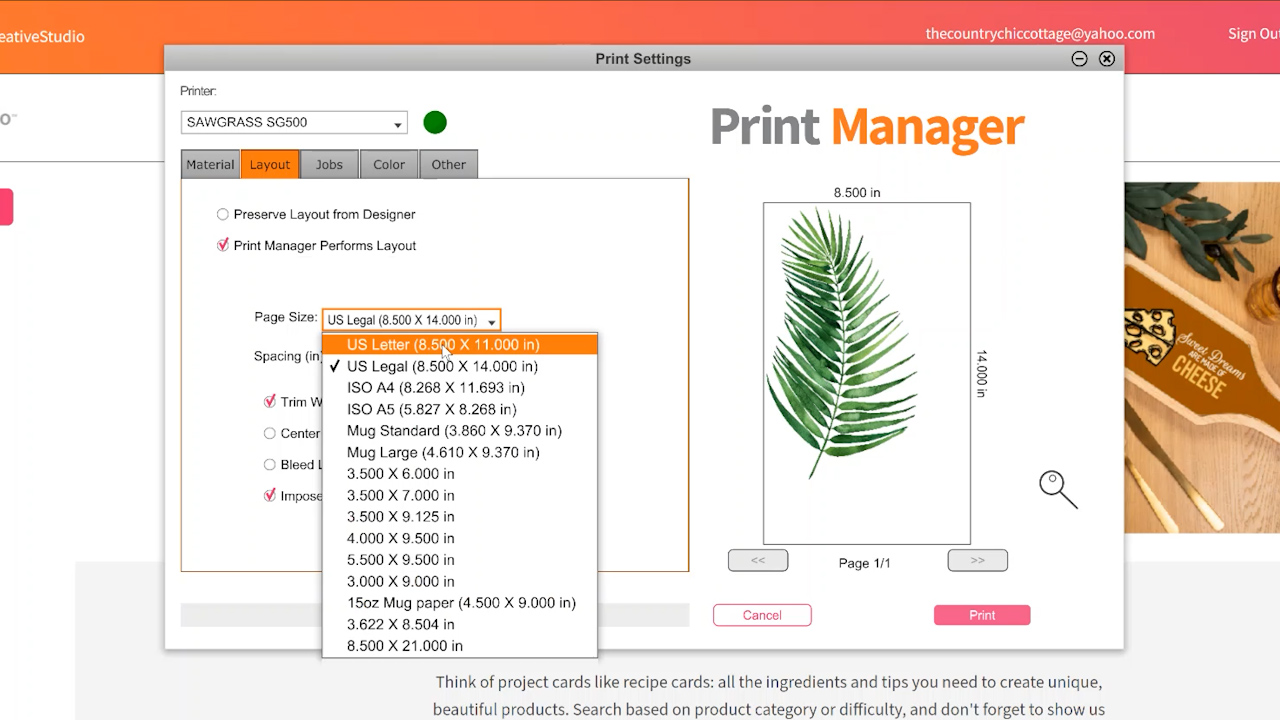
When it comes to “Page Size” you always want these dimensions to be the size of your paper. When we select “Print Manager Performs Layout” we have some page size options. These are typical paper sizes and I am going to choose 8.5″x 11″ which is the US Letter size.
Next we’ll look at Spacing. When I open this it’s automatically set to 0.0. If I bump that up or down it will move the image down and over that much. You could use this tool to space out your designs or move them around the paper as needed.
Trim Whitespace is also selected. When that isn’t clicked, Print Manager leaves white space around the design. If you want to save paper, you can easily trim that away by clicking that box.
You can also center your image to the center of the paper by checking the box next to Center.
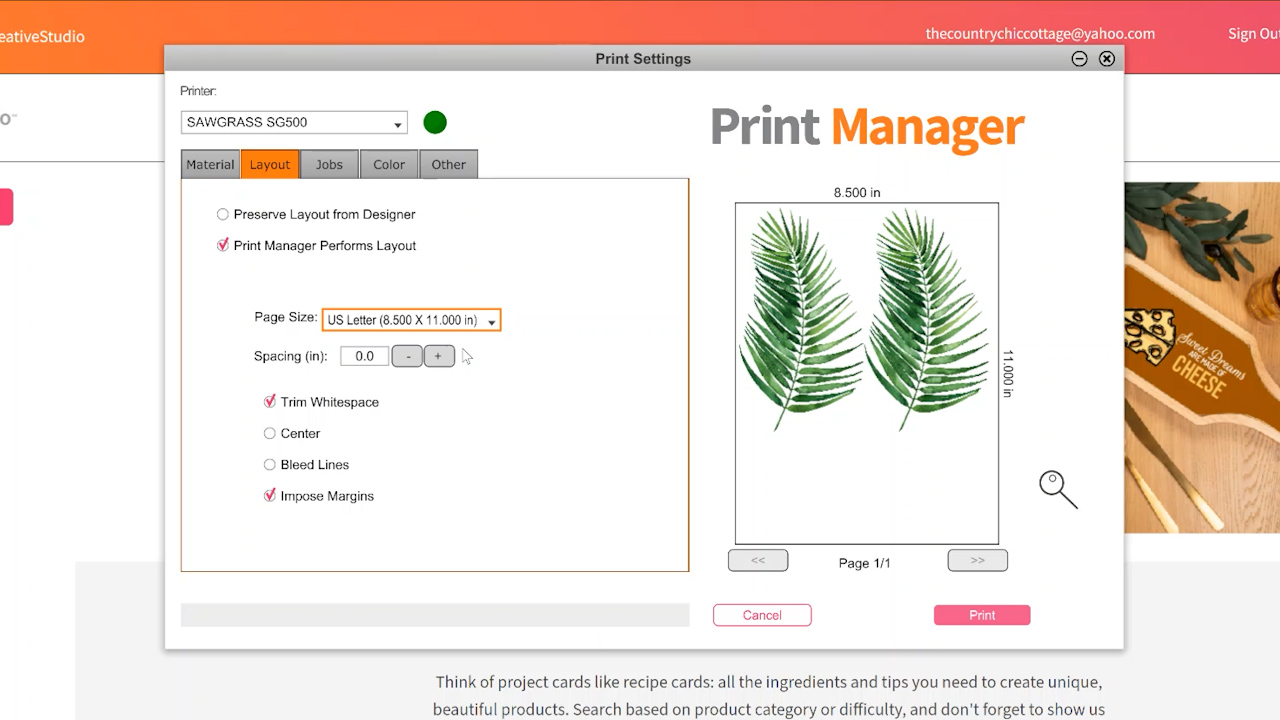
With some designs, you could add bleed lines around the outside edge. This would depend on the image you’re using and if you’re cutting out the image and need that bleed line.
The Impose Margins box is checked. If you unclick that, your image will be moved all the way to the side and top of the paper. There is a certain margin on the left and on the top that is not a printable area. If you click Impose Margins, your design will be moved to where the entire design will print.
Jobs Tab in Sawgrass Print Manager
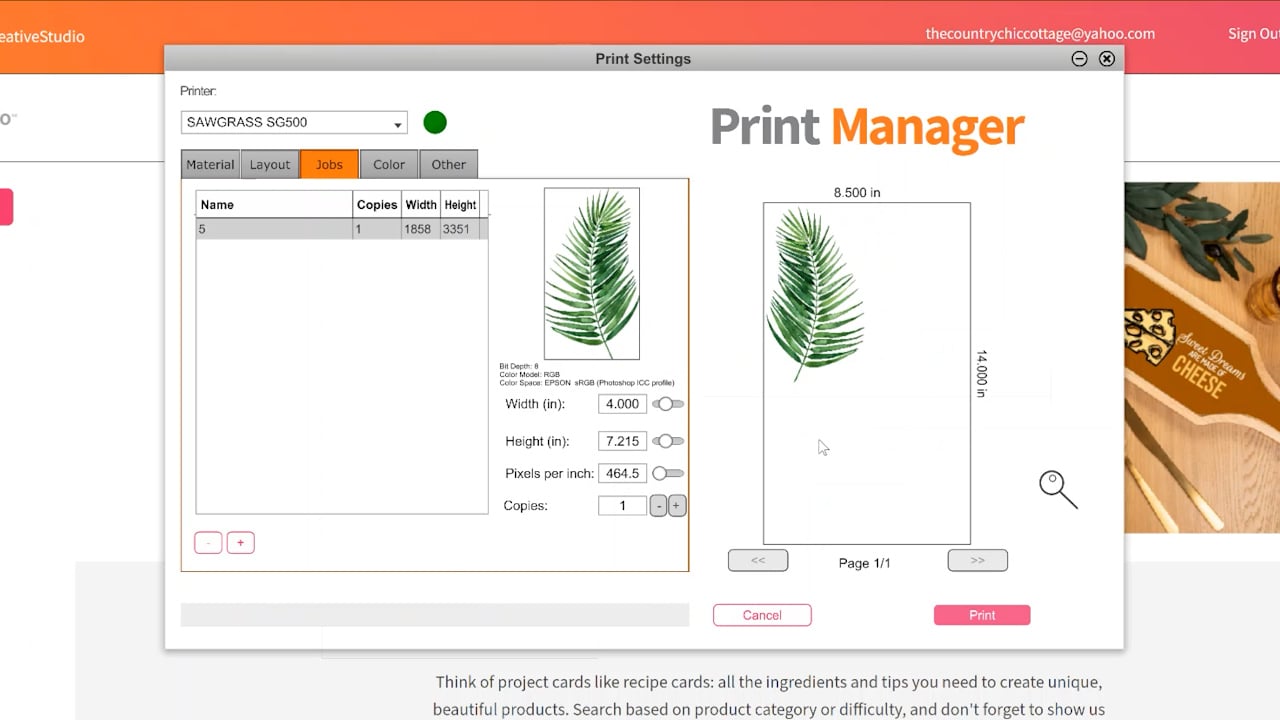
There are other options in the Sawgrass Print Manager. If we click the Jobs tab, we can see the file that I’m printing, how wide and high the file is, and we can actually resize the designs right here in the Print Manager.
So, if I wanted my design even smaller for some reason, I can make it smaller and it does lock the aspect ratio so I can also resize it back if needed. From here you could also change the pixels per inch and the number of copies. This eliminates the need for other programs to layout or edit your design, it can all be done right in Sawgrass Print Manager.
Color Tab in Sawgrass Print Manager
Use the color tab to alter the colors. Vivid is for most images and you can use photographic for photographs especially if they have people in them. You could also adjust your color right here in Print Manager.
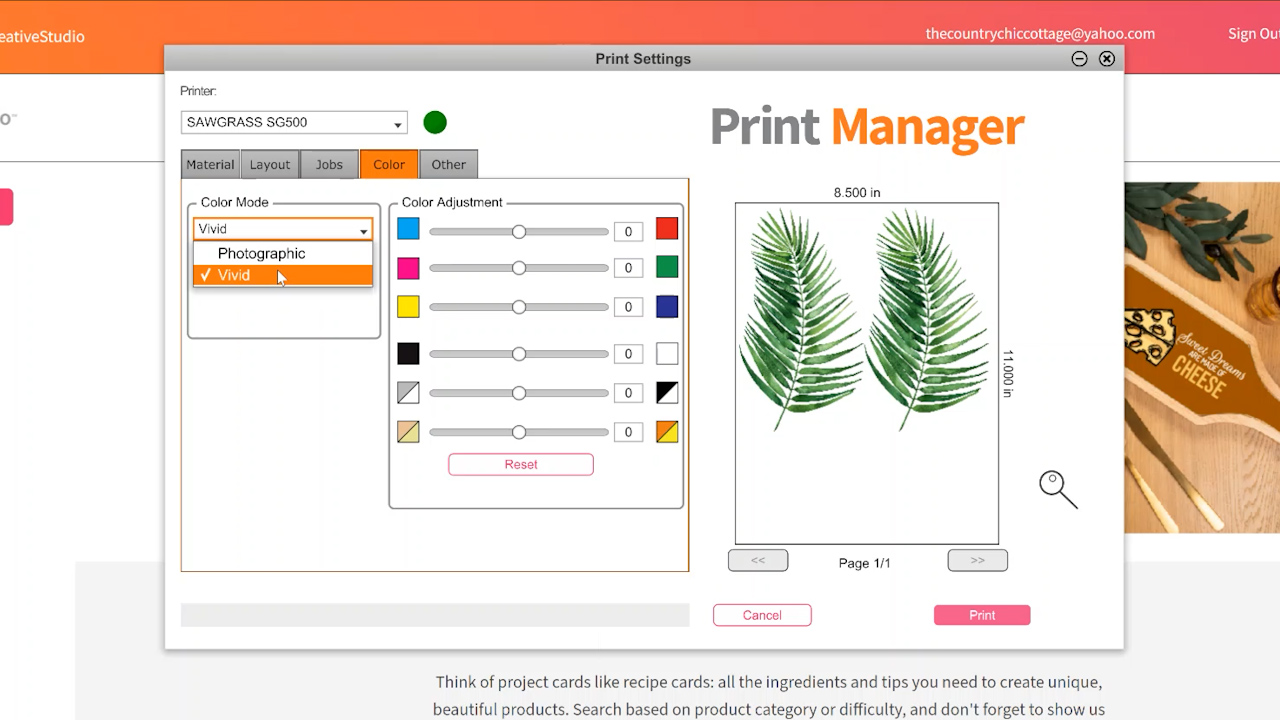
I did want to note, when you’re adjusting the tint of the color, it just sort of tints it whatever color you select. It doesn’t actually change the object color.
You then have the option to adjust the contrast, brightness, and saturation. At any time you can also select “Reset” and everything will go back to zero.
Other Tab in Print Manager
In the “Other” tab you can choose to print this to a file instead of printing it to your printer itself.
Adding Additional Images to Print
Let’s go back to the “Jobs” tab and look at one more thing we can do. Here on the Jobs tab, there is a plus and minus that can be clicked. If I click the minus it will remove the file but I can also add a file by clicking the plus symbol.
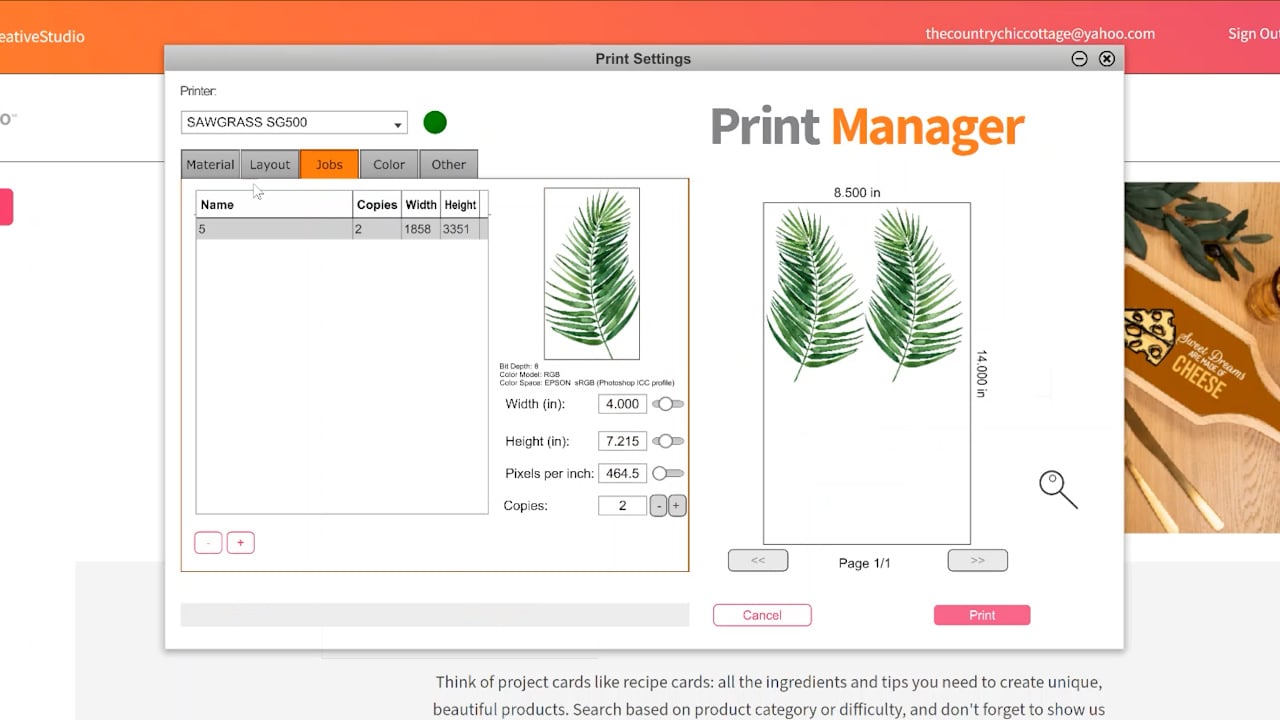
By clicking the plus we can add a file to this specific job. I can choose any image, it doesn’t have to be the same image or even the same size image.
This is great because it allows us to quickly and easily fill an entire sheet of sublimation paper with images. They can be resized and duplicated as needed and I don’t have to use any other program to do it. Now I could click print and print to my Sawgrass printer.
Sawgrass Printer Utilities
Right click on Sawgrass Print Manager again and below the Smart Folder Manager you can choose Printer Utilities. Here you can see different maintenance options.
You can see your ink and waste levels. The serial number, IP address, firmware, etc. You can run a nozzle check, run a head clean on one or more colors, you can also print a primary chart or full-page bleed of any color right here in the Sawgrass Print Manager.
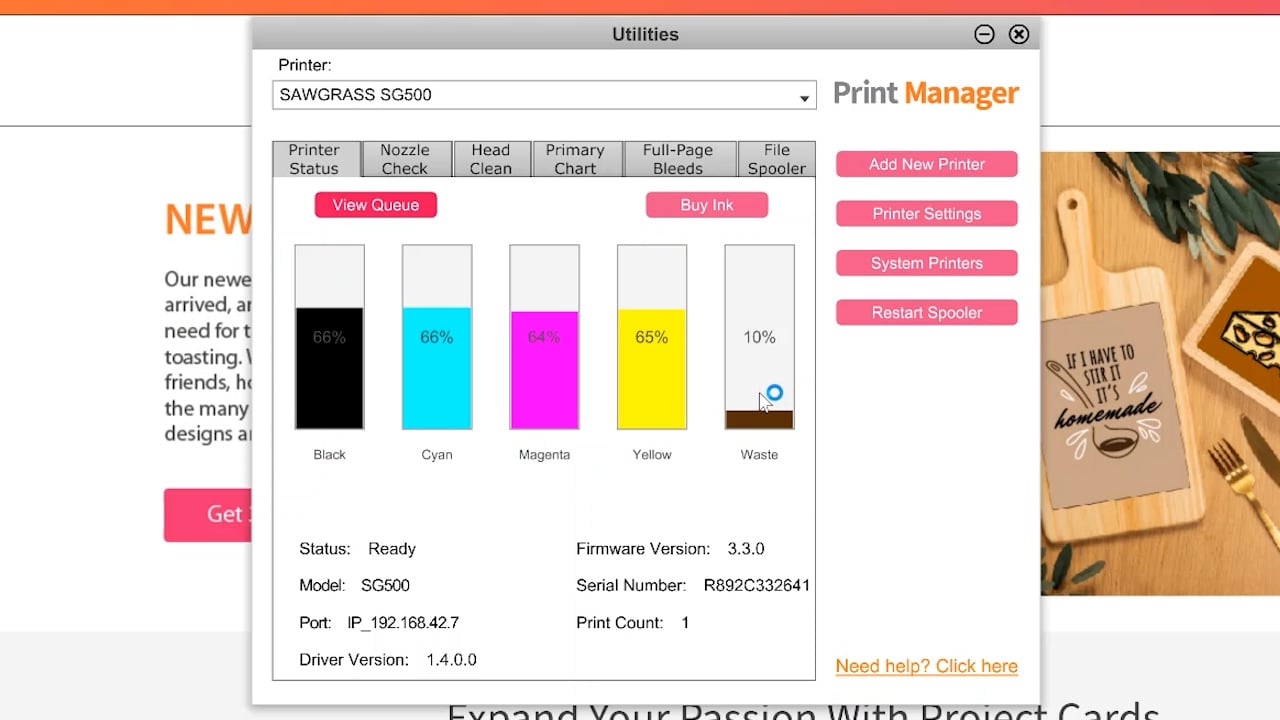
The file spooler would be when Sawgrass help is helping you with things and a lot of these would be things that the help desk might ask you to do but this is where it will be located.
From this location, you can also add a new printer. You can go to your printer settings, see what ink you have installed, you can go to your system printer’s dialogue box, or restart your spooler from this window.
Options Tab
Then if we right-click again, we can see options. And a few of these that you might need would include language, units, or you could change how often your status refreshes.

If you want to use PDFs within print manager, you will need to download something called Ghostcript and this is where you would download that. And then you can also check your connection settings.
Here you can also manage your page sizes. Print Manager has sizes already available but if you had something that wasn’t on this list this is where you would add that. You would put your dimensions in here and then save it as a page size and then it would be in your dropdown when you go to print another time from Sawgrass Print Manager.
How to Print From Google Docs
So I’m going to use Google Docs as my example because that’s a thing a lot of people are familiar with. But you can use the same procedure with any program on your computer to print to your Sawgrass printer. That means that any program will print to your printer. So whatever you’re familiar with and want to use you can use it with your Sawgrass printer to print sublimation prints.
So from Google Docs, you can select print and then pull down the destination. For me, I need to click see more and then I can select Sawgrass Print Manager from the list. So now I’m printing to the Sawgrass Print Manager and I can click print.
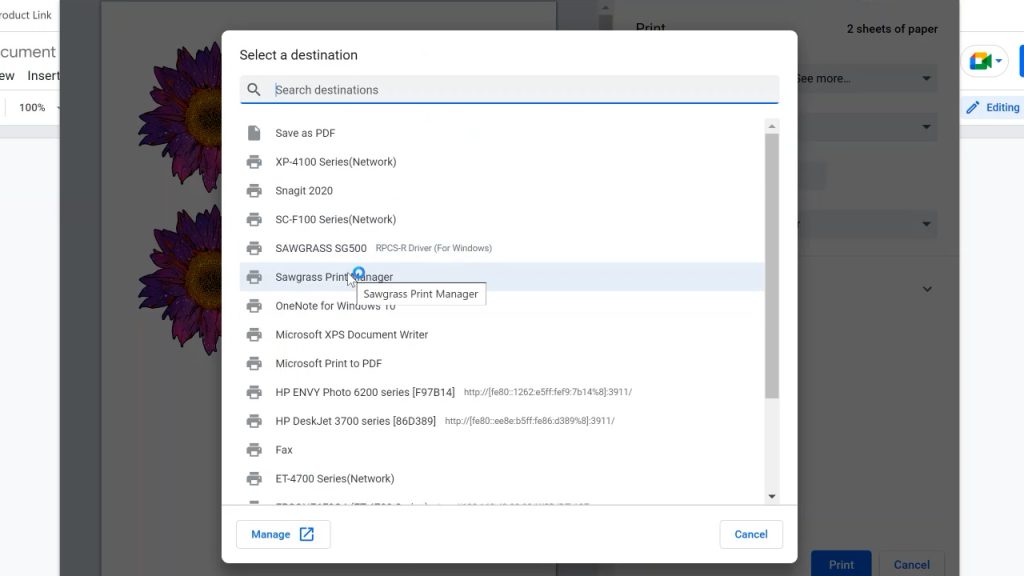
Now my computer is going to open up Print Manager and all the options I had before when I opened a local file are now available to me and I can make any changes I want or need.
I could change any of these features that I wanted to change. I could even add a job if I would like to. The fact that I am printing from Google Docs this time does not matter, you can print from anywhere and use Print Manager to customize it, including the color and all those other options we talked about before.
Final Thoughts on Sawgrass Print Manager
Now you’ve seen how I printed from Sawgrass Print Manager. My favorite feature hands down is being able to pull up any file, jpeg, PNG, or whatever I have on my computer and print it and have the option to do more than one at a time.
I showed you how to add two, but you can add up to seven files at a time right in Sawgrass Print Manager to print with your Sawgrass printer. That means if you had a bunch of small files you could optimize the layout on your paper and get the most use out of that paper without needing another design program.
Print Manager is great if you are not familiar with another design program or you’re in a hurry you may find Sawgrass Print Manager is easier to use because it definitely can be. Especially when trying to print multiple images on the same sheet. A project with two different images would’ve taken me way longer in something like Photoshop to set up the layout.
Sawgrass Print Manager is super easy to use and a great resource for those of you that have a Sawgrass printer.
