This post and photos may contain Amazon or other affiliate links. If you purchase something through any link, I may receive a small commission at no extra charge to you. Any supplies used may be given to me free of charge, however, all projects and opinions are my own.
Today I am going to set up and use the xTool Screen Printer and show you how to create a project using it. If you like screen printing you’re going to love this tool.
There are a lot of ways to create screen-printed projects and I think you’re going to love how easy using the xTool Screen Printer is!
You can watch me go through the whole process by pressing play on the video below.
Table of Contents
The xTool Screen Printer is a kit that works with the xTool lasers to easily create screens that can be used on shirts, bags, paper, and more. My favorite thing about this kit is that it takes all the guesswork out of design placement which can be the trickiest part of screen printing.
If you love screen printing or want to get into screen printing and you have a laser, I really think you’ll like this kit. If you’re a screen printer and you don’t have a laser, I recommend you keep reading because using a laser to make these screens was easy and extremely accurate.
Supplies Used
What Lasers Work with the xTool Screen Printer?
Today I am using the xTool Screen Printer Multi Color Kit. With this kit, you can use the D-series and S-series lasers by xTool. If you have the xTool M1 or F1, you can use the xTool Screen Printer Basic Kit.
Make sure you’re choosing the right kit for the laser you have.
Now that we’ve talked about the xTool Screen Printer let’s jump into making a screen with an xTool laser. The design I’m using today is one color but fairly intricate. I wanted to test the process to see how well it would work with more detailed designs and I think it did really well.
Everything that you need to create a screen comes in the kit when you purchase it. Everything I am using, outside of my xTool laser, came in the kit I’m using today.
When you screen print, you’re using the screen printing ink and you can apply that ink on any type of fabric and you can use it on things that aren’t fabric too!
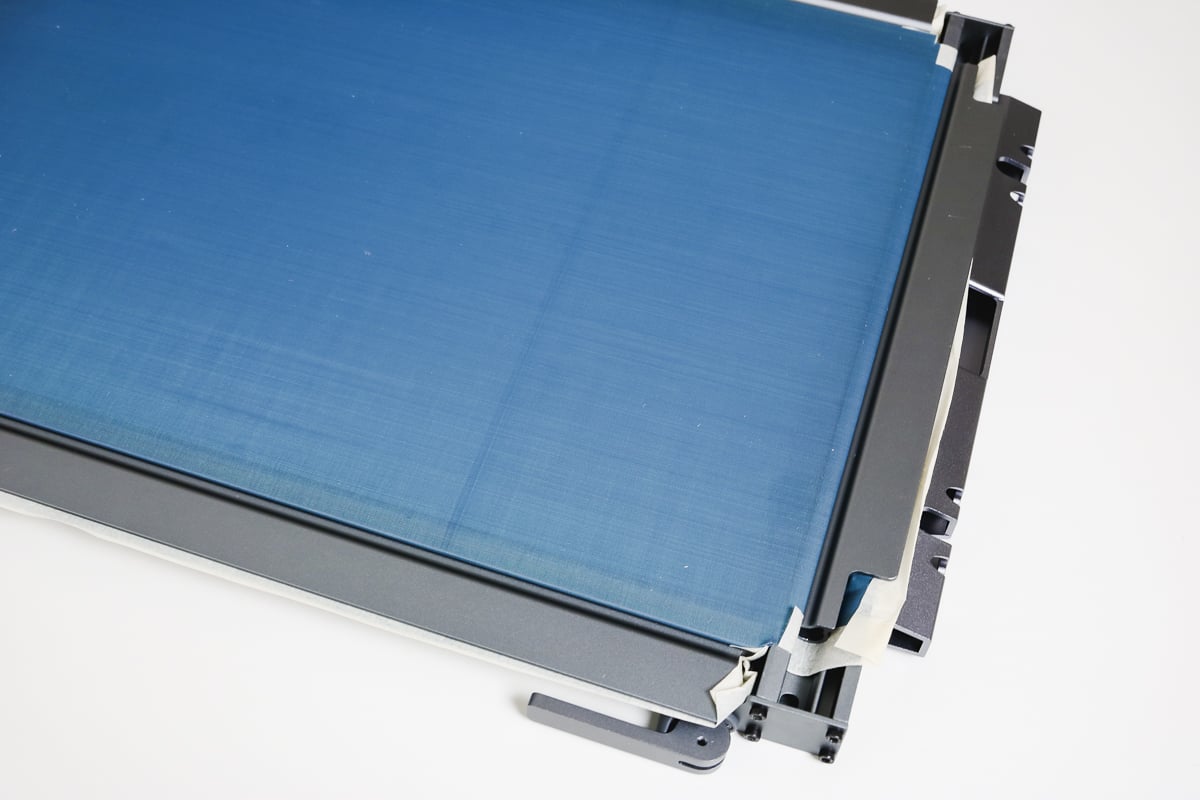
Step 1. Add the Screen to the Frame
The first thing we need to do is add the screen to the frame. The screen comes on a piece of cardboard, do not remove that yet! I’ll tell you when to remove it.
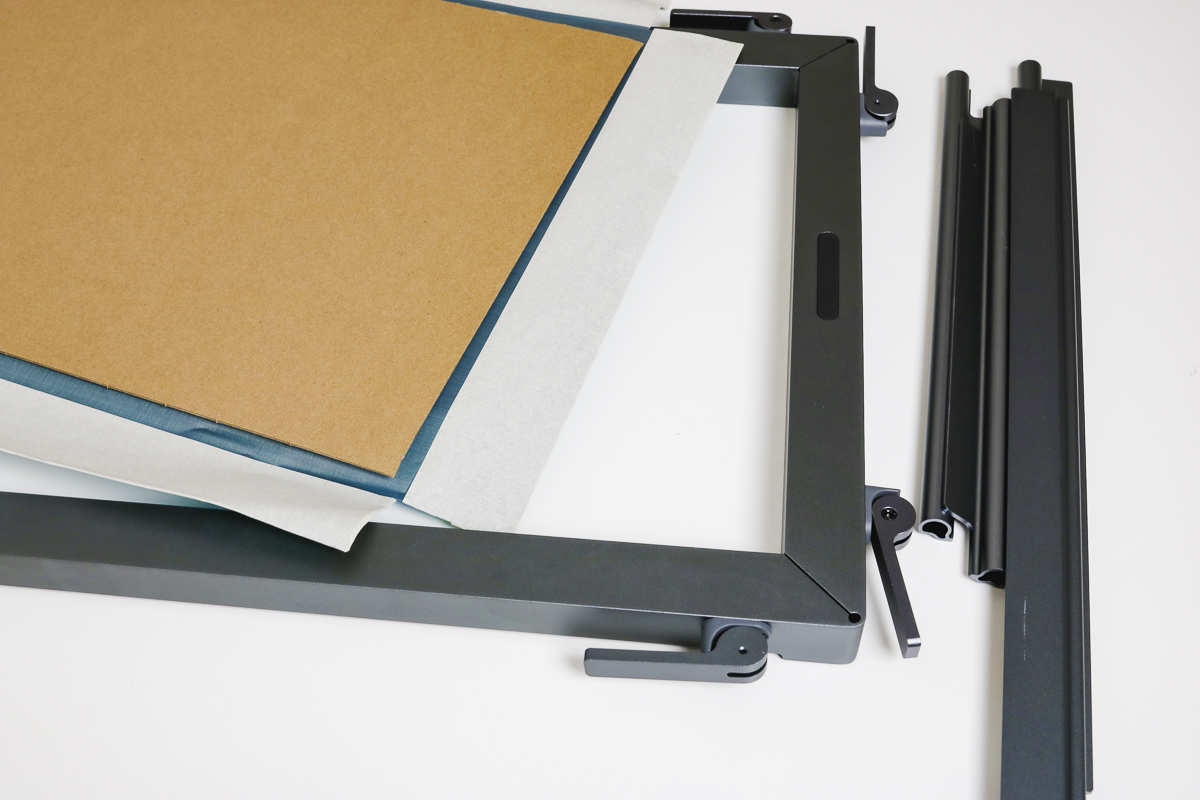
Now, we need to open the screen. To open the frame flip the handles to the corners. With the handles flipped to the corners the frame is open. To close the frame flip them toward the center.
To add the scree to the frame, you need to open all of the handles.
Flip the frame over so you can see the groves in the frame. Place the screen on top of the back of the frame with the cardboard side down. The cardboard piece will fit within the frame opening.
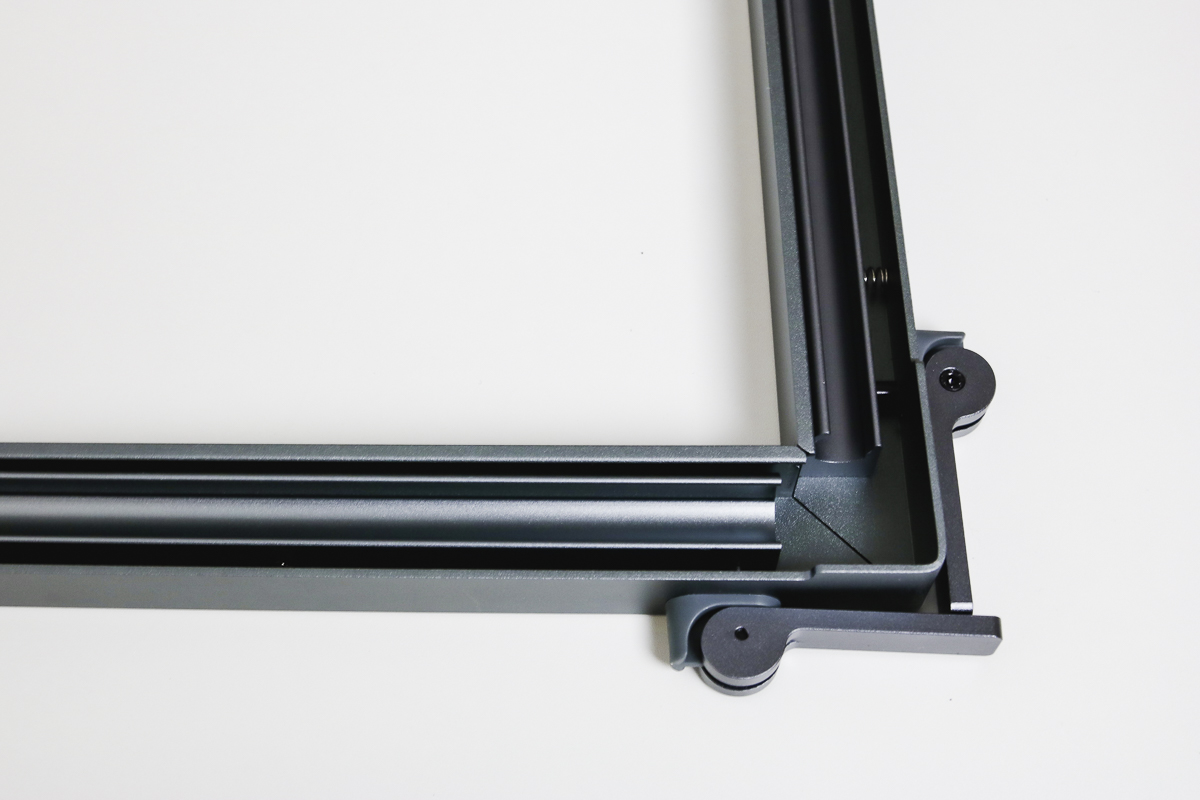
Next, we’re going to add the fixing pins in place to pull the screen tight. The cardboard piece helps line the screen up perfectly so when you add the fixing pins everything is placed correctly.
Place the fixing pins on top of the screen and fit them into the grooves on the back of the frame. Insert the pins at a 45 degree angle then roll the pins until they are flat. Do this on all four sides locking all the fixing pins into place.
To ensure the pins are locked in place, flip the frame over. The screen should not fall out or move. If it does you’ll need to turn it back over and check all the pins and make sure they’re in place.
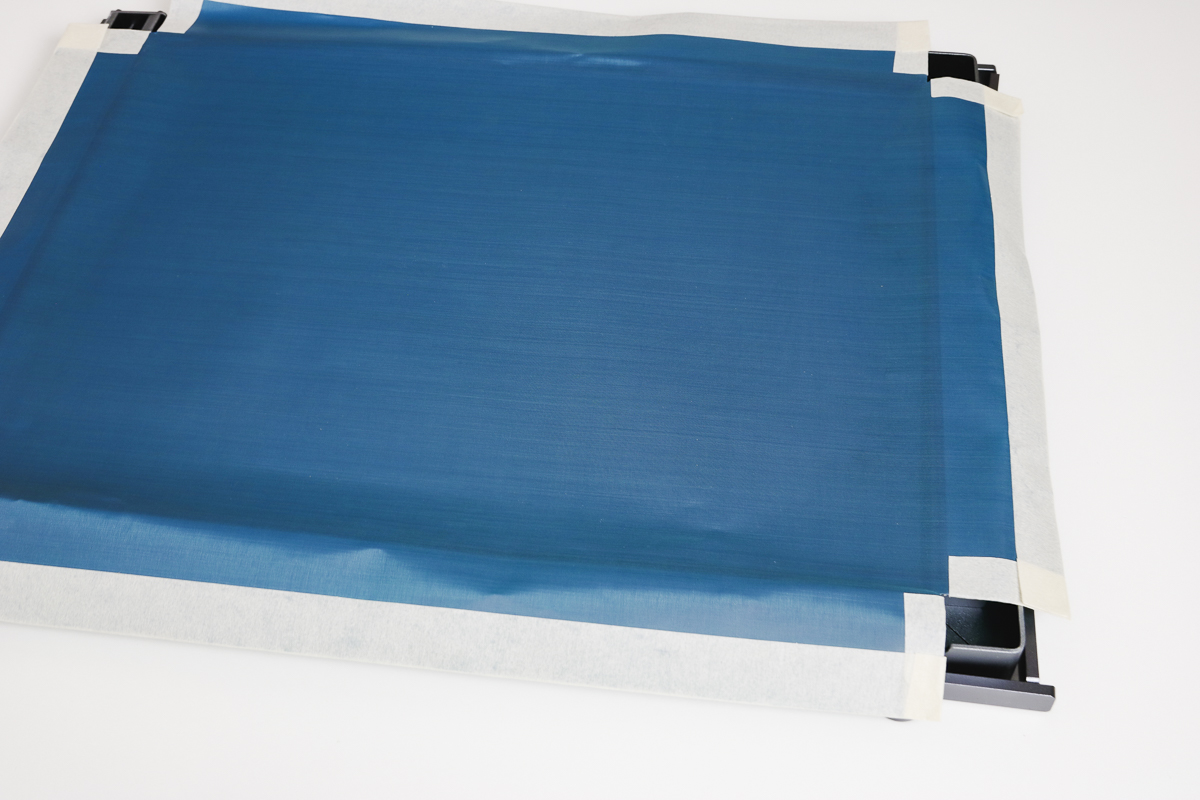
Step 2. Remove the Cardboard Piece from the Screen
The cardboard is attached to the screen with a light adhesive. Get under a corner, you can use a tool if needed and lift the cardboard up. Roll the cardboard away from the screen moving from one side of the screen to the other.
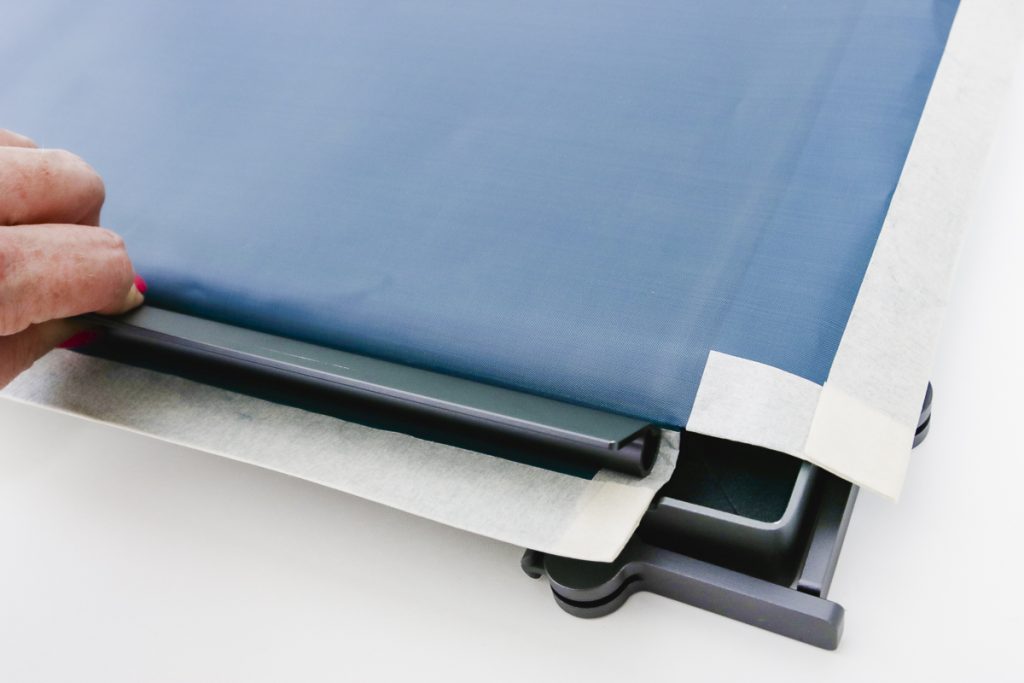
The adhesive is not very strong so it doesn’t take a lot of work to remove it. When the cardboard is removed, start closing the clamps.
To close the clamps, move all the handles to the center of the frame. With the clamps closed, the screen should be very tight. If you tap it, it should almost sound like a drum.
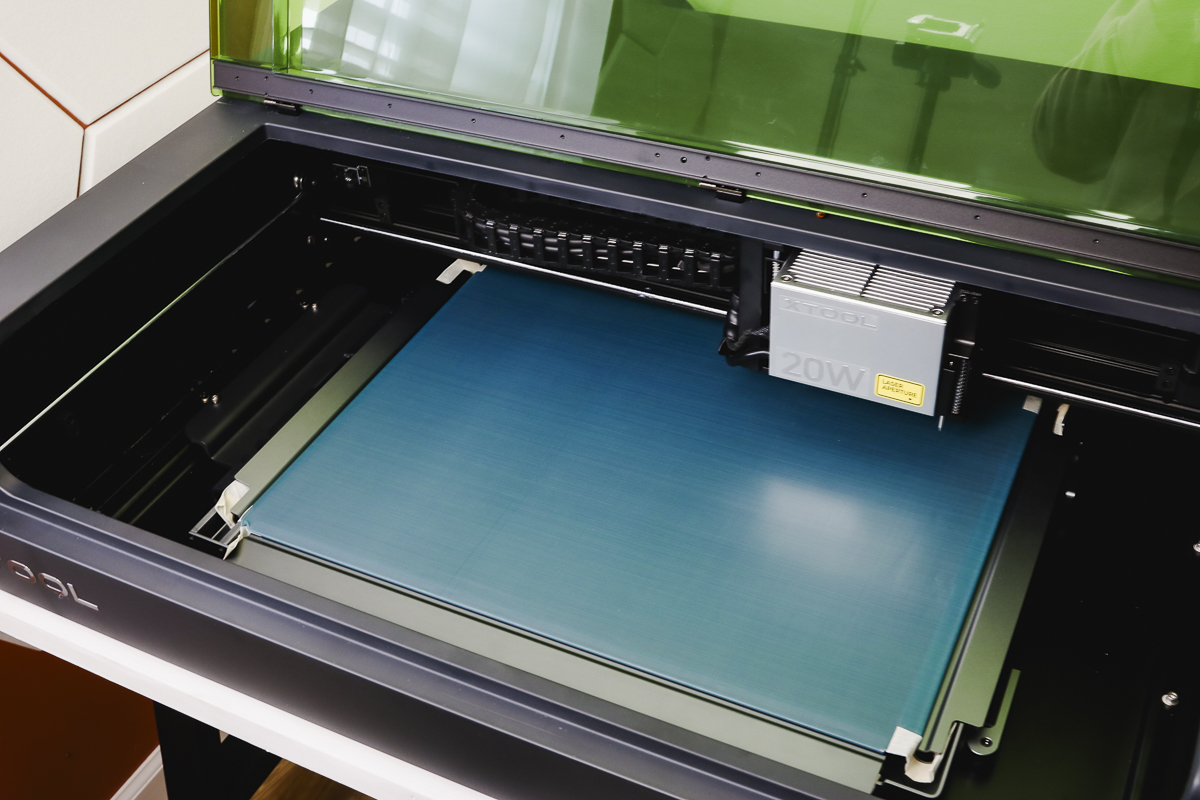
Step 3. Add Screen Print Frame to the xTool
Before we add the screen print frame to the laser, we need to remove anything from inside the laser. If you have the honeycomb tray or triangular prisms in the laser, remove them all.
The xTool Screen Printer comes with a bracket that you will add to the xTool laser for locating the screen. NOTE: I added mine to the left side of the S1 and it should have been on the right side!
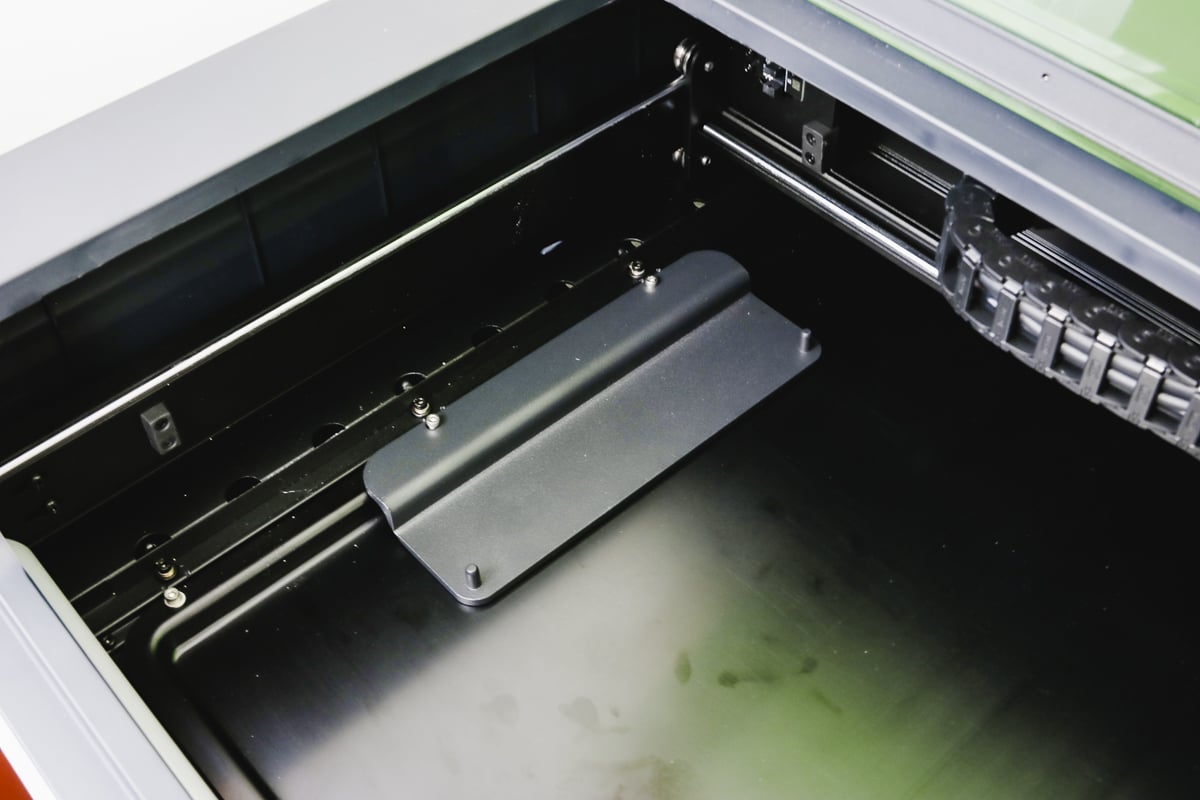
To add the bracket, remove the screws from inside the S1 and then line the holes up with the screen printer and then use the longer screws that came with the screen printer to screw it into place.
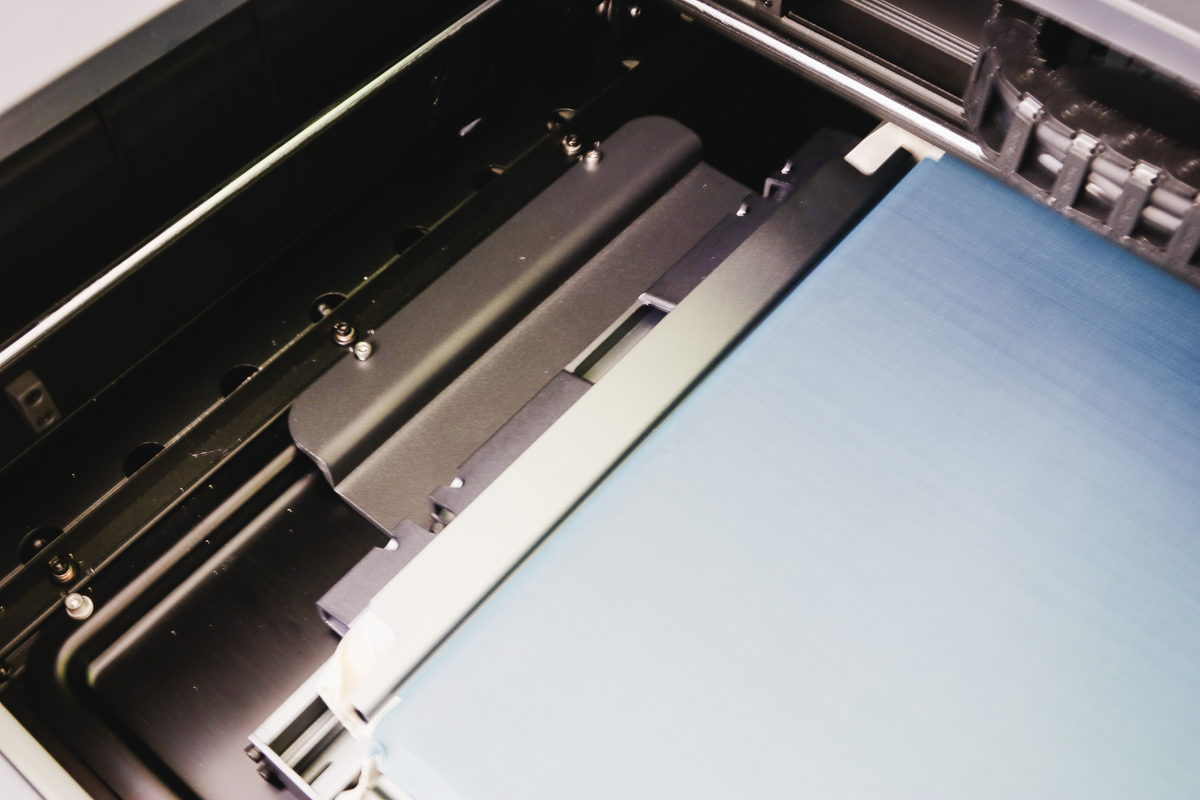
On the bracket, you can see that there are 2 locating pins. These pins line up with the screen frame. Place the screen frame in the laser screen side up and locator pins will hold the screen in place.
Having the locating pins helps ensure that the screen is in the exact location every time. If you make multiple screens for a design that has multiple colors this process will ensure that each screen is located correctly.
Step 4. Design Screen Print
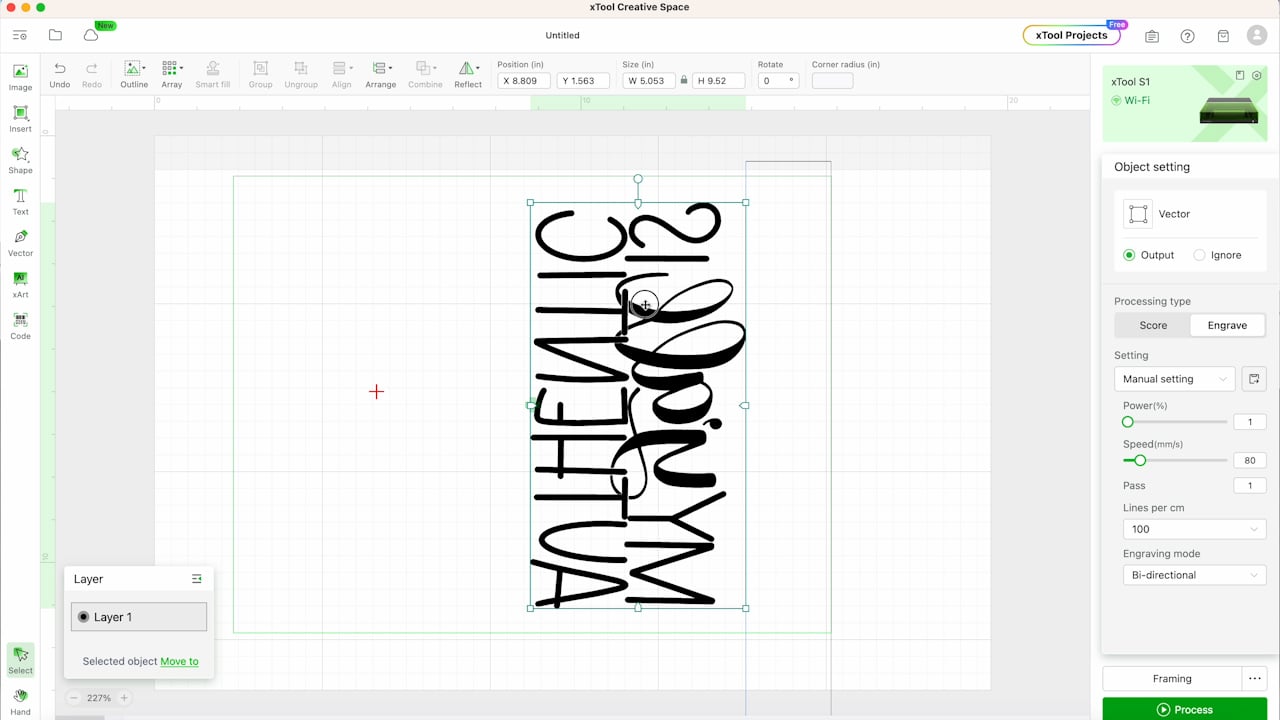
Next, we’re going to move into xTool Creative Space and design our screen print. Upload your desired design.
On the right side, you need to change the top option from Laser Flat to Screen Print.
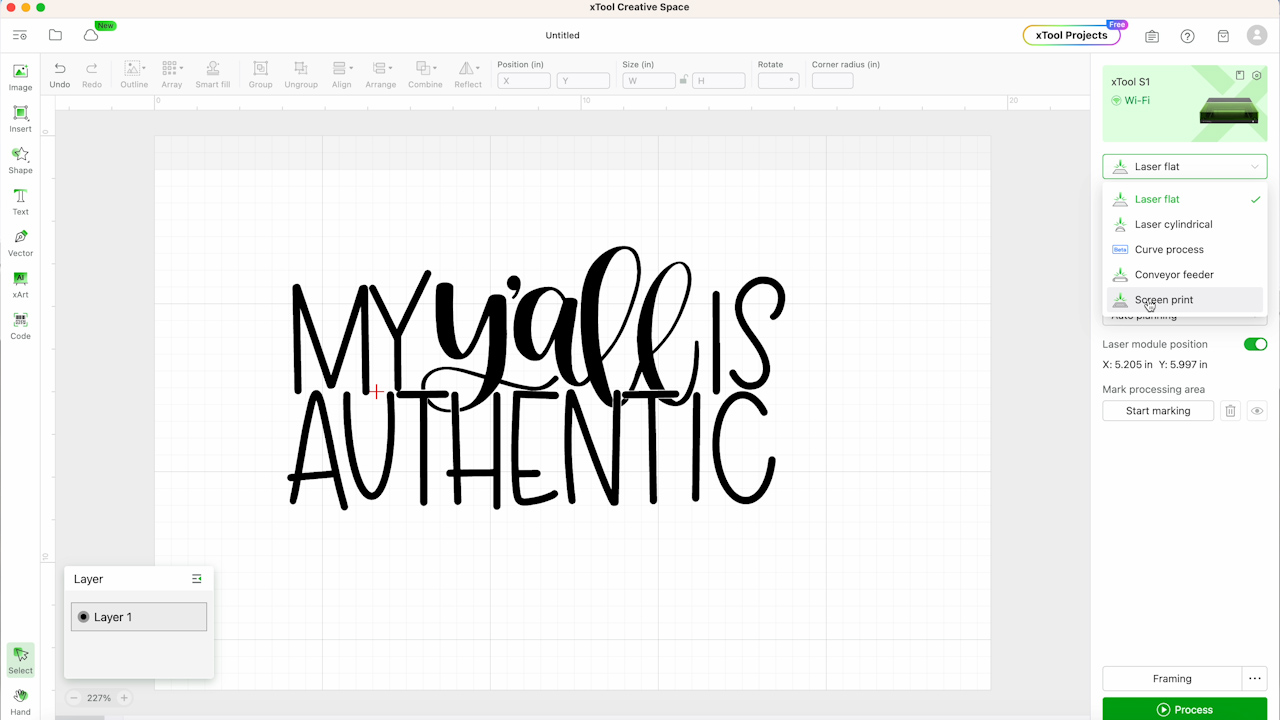
Next, it will prompt you to install the frame fixing piece and we have already done that. Now you can see a green rectangle on the screen. This represents the area of the screen that can be engraved since we used the bracket we know the exact area.
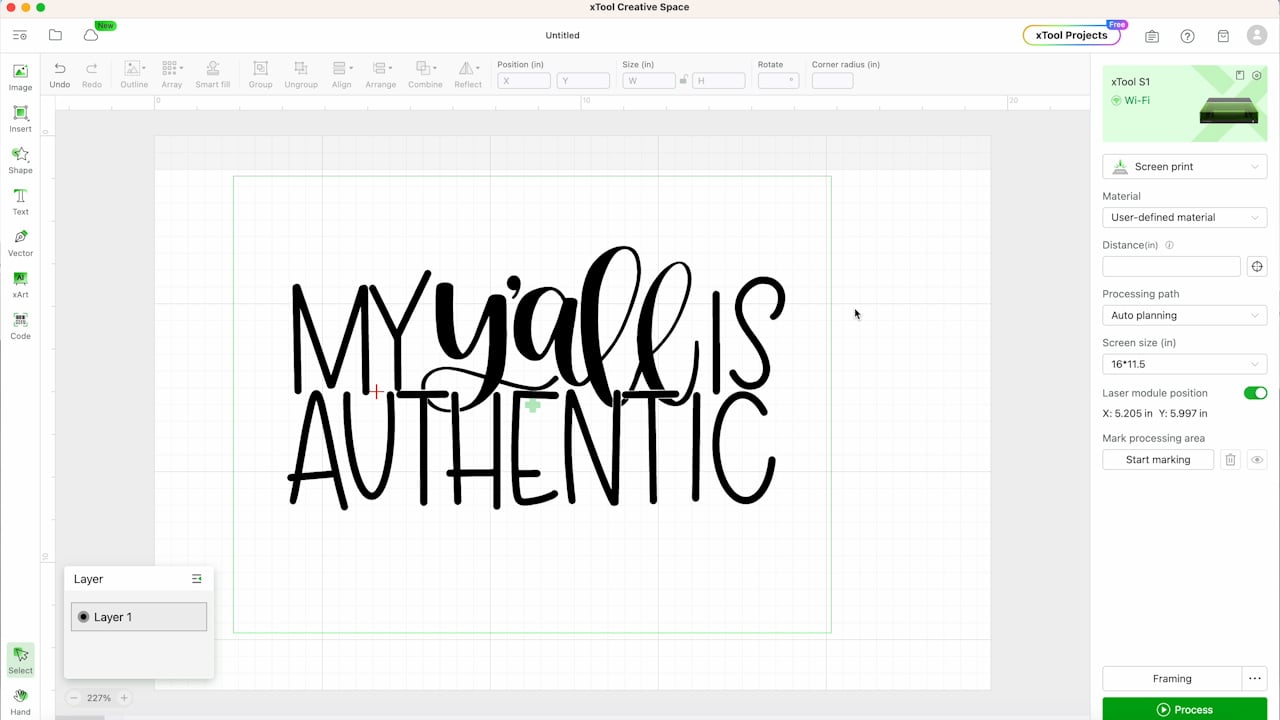
With the laser turned on, we’re going to follow the steps that we used in our previous xTool tutorial to auto-measure the screen.
With the design uploaded into Creative Space change the process type to engrave.
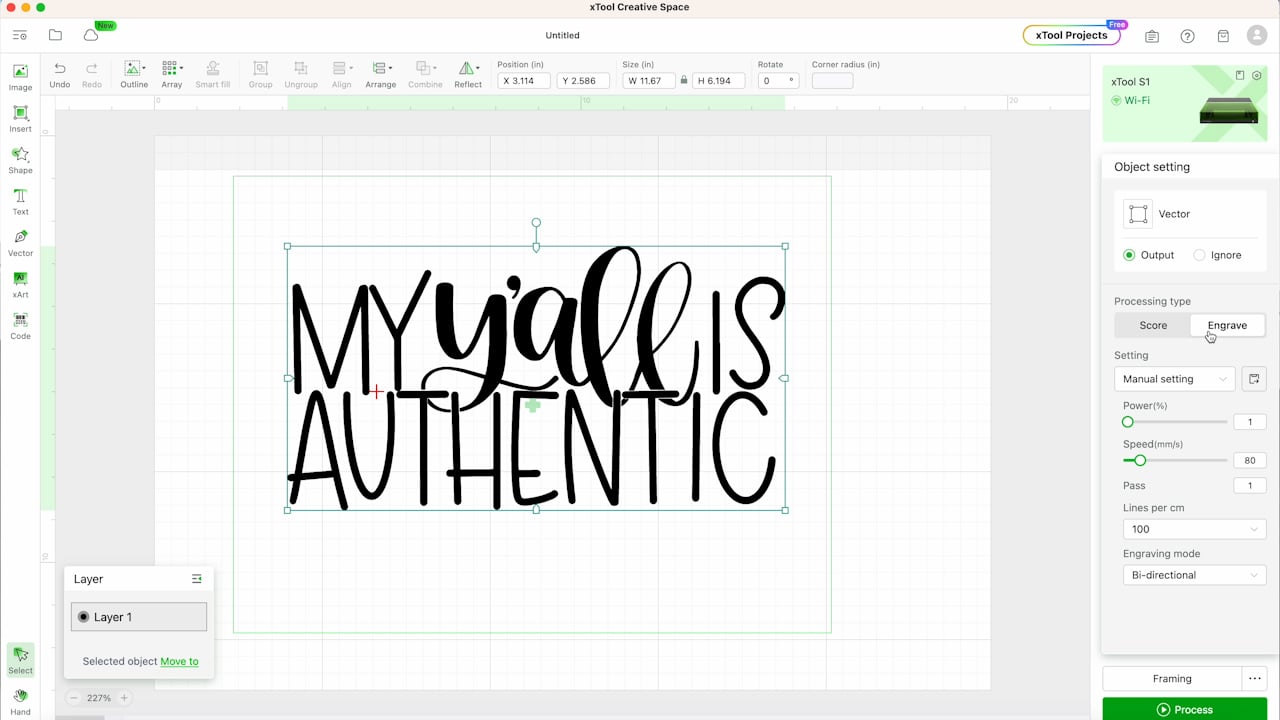
Make sure your design fits in the green rectangle. You can resize the design if needed right in Creative Space.
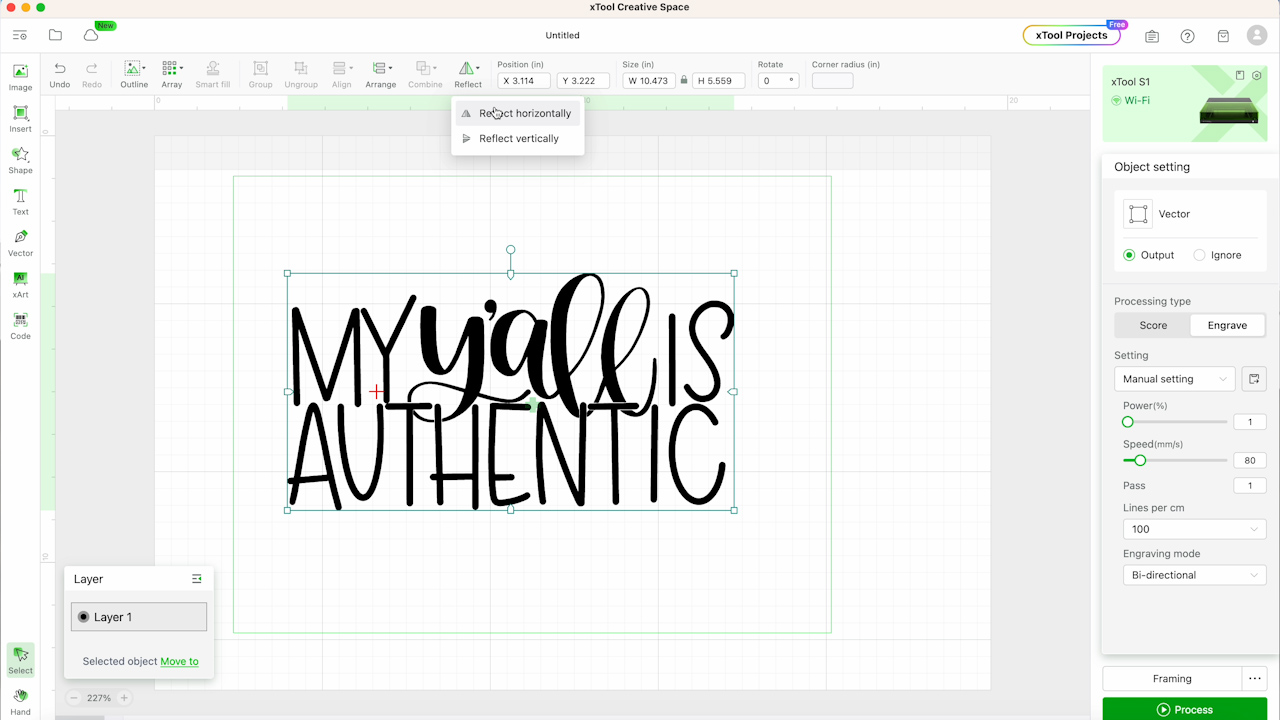
Because of how this screen printer works we need to mirror our design. In the top toolbar click Reflect and then select Reflect Horizontally. This will mirror the design.
Step 5. Locate the Design on the Screen
The next step is to locate the design properly on the screen. We already have our screen in the frame so wherever the design is located is where it is going to be engraved on the screen.
I am going to use this design to make a shirt. To make locating the design easy I am going to add a rectangle shape to the canvas and size it to 2″ by 15″. Now, I can add this rectangle to the top of the screen and use that as a guide for where to locate the design. I’ve found this measurement is right for most shirts.
This is the setup I am using, you can make whatever adjustments work best for you. If you add a rectangle, delete it off after you get the design set up how you want it. NOTE: Flip this location if you have your bracket on the right side in your laser.
Step 6. Update Settings in Creative Space
With our design located correctly, we can get ready to proceed. Under Material, pick the type of screen you’re using. I am selecting Coated Screen 100 Mesh. With that selected. Creative Space will adjust the power and speed.
Next, we can close the laser and click Process. Click the button on the front of the S1 to start the process.
Step 7. Engrave the Screen
The S1 will start the process of engraving the screen. Before you begin make sure you have your laser vented either out a window or to the air filter.
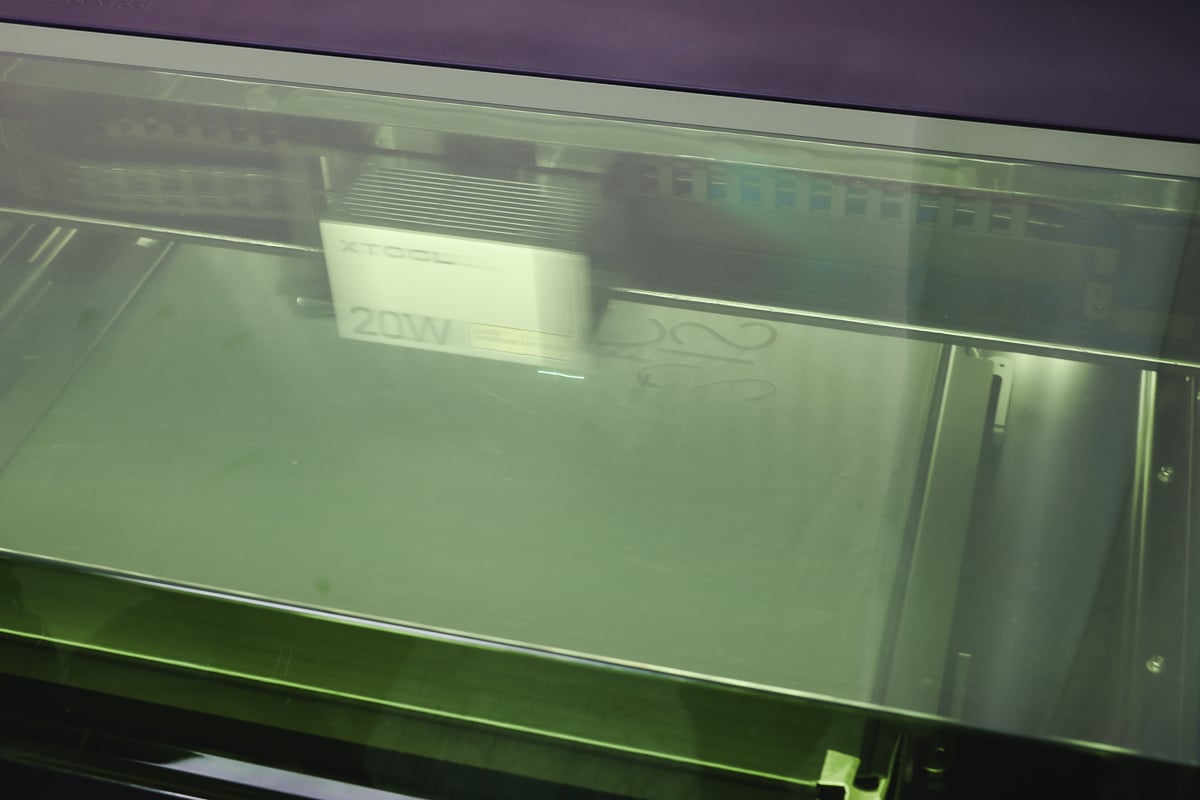
When the laser is done, remove the screen from the laser and make sure it is clean. You may need to use compressed air or something to remove everything from the screen.
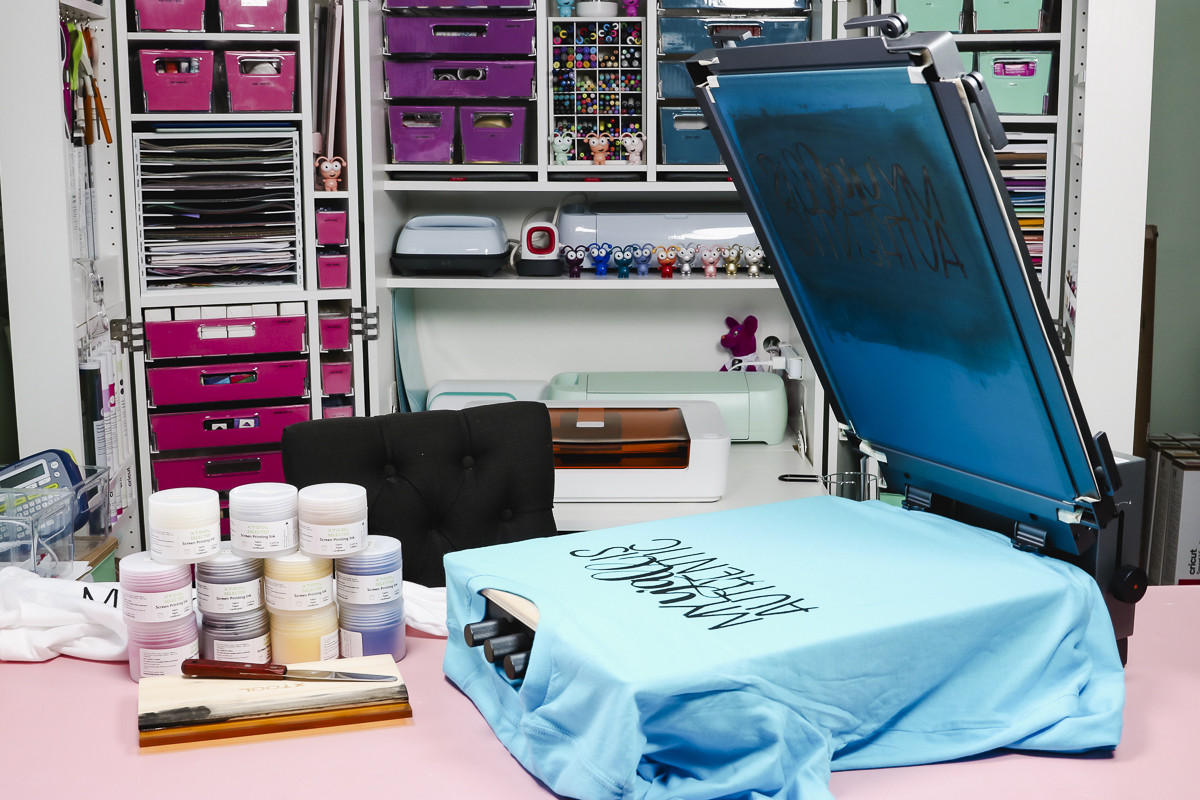
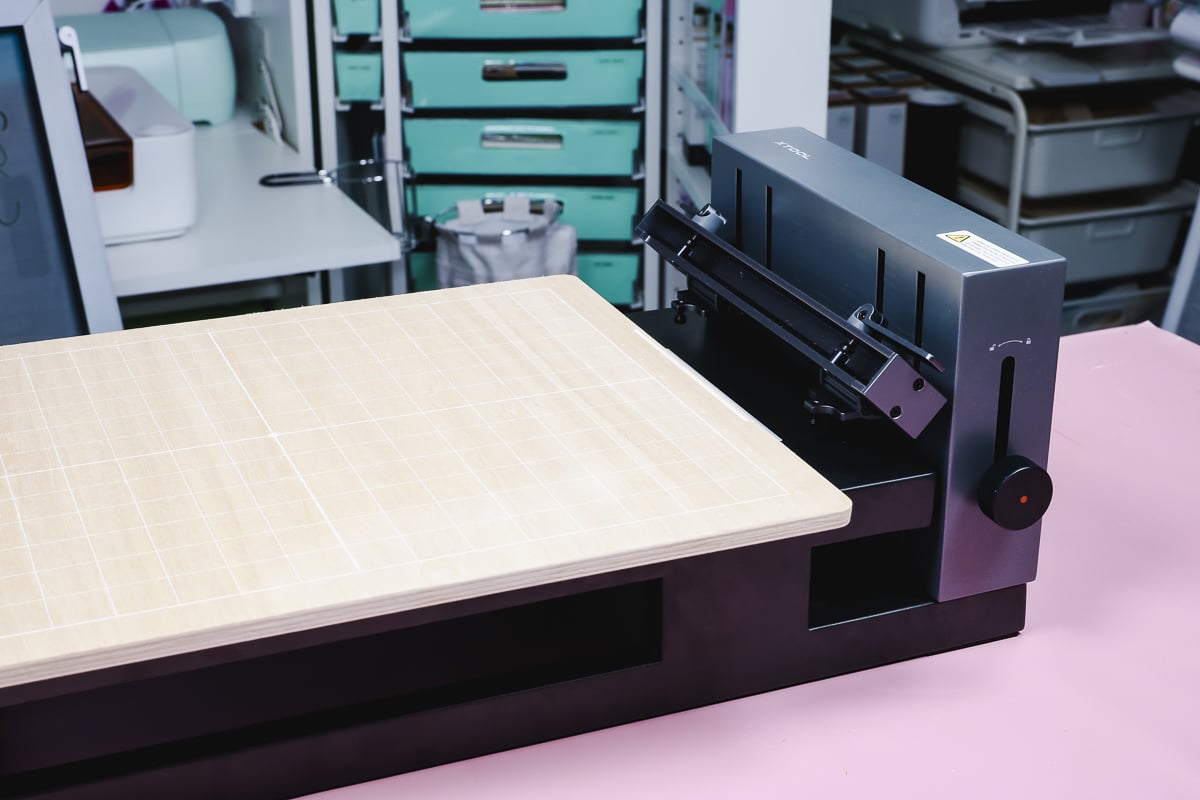
Now that the screen is ready to go we can put it on the stand and screen print some shirts. The xTool Screen Printer kit comes with everything you need to get started.
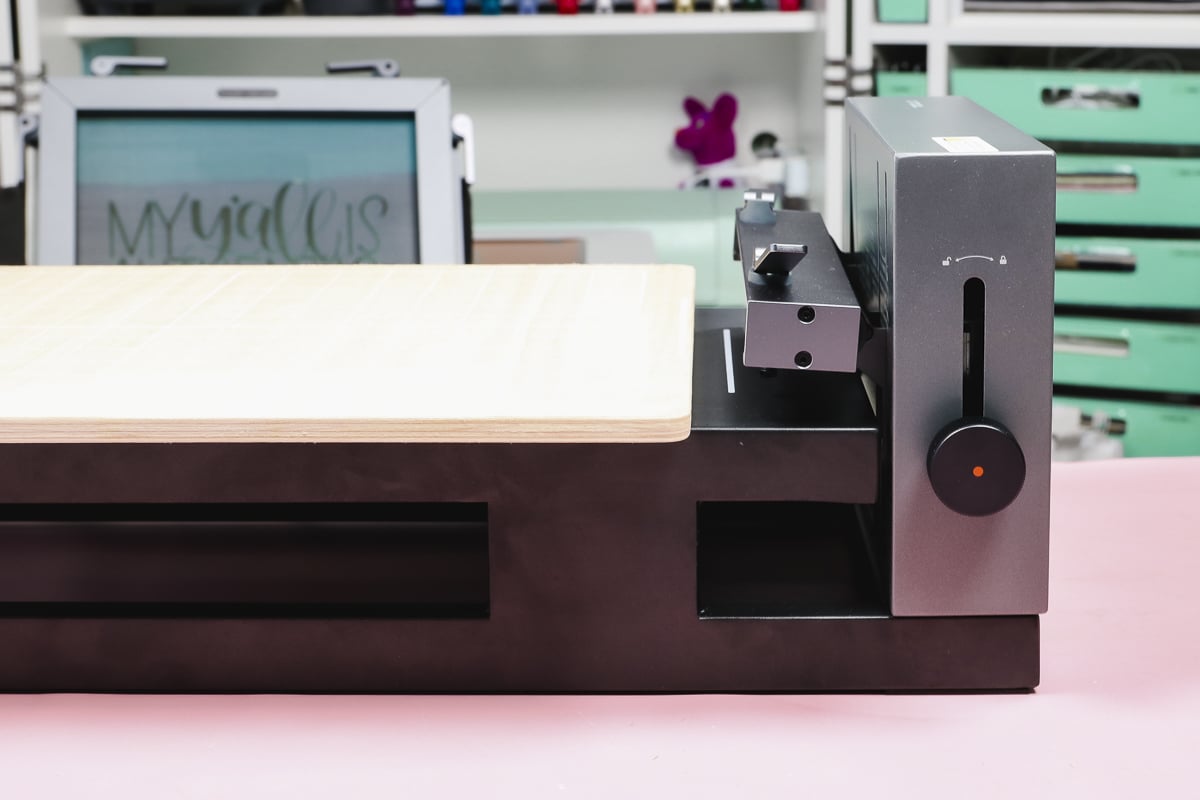
Step 1. Setup the Screen Printer
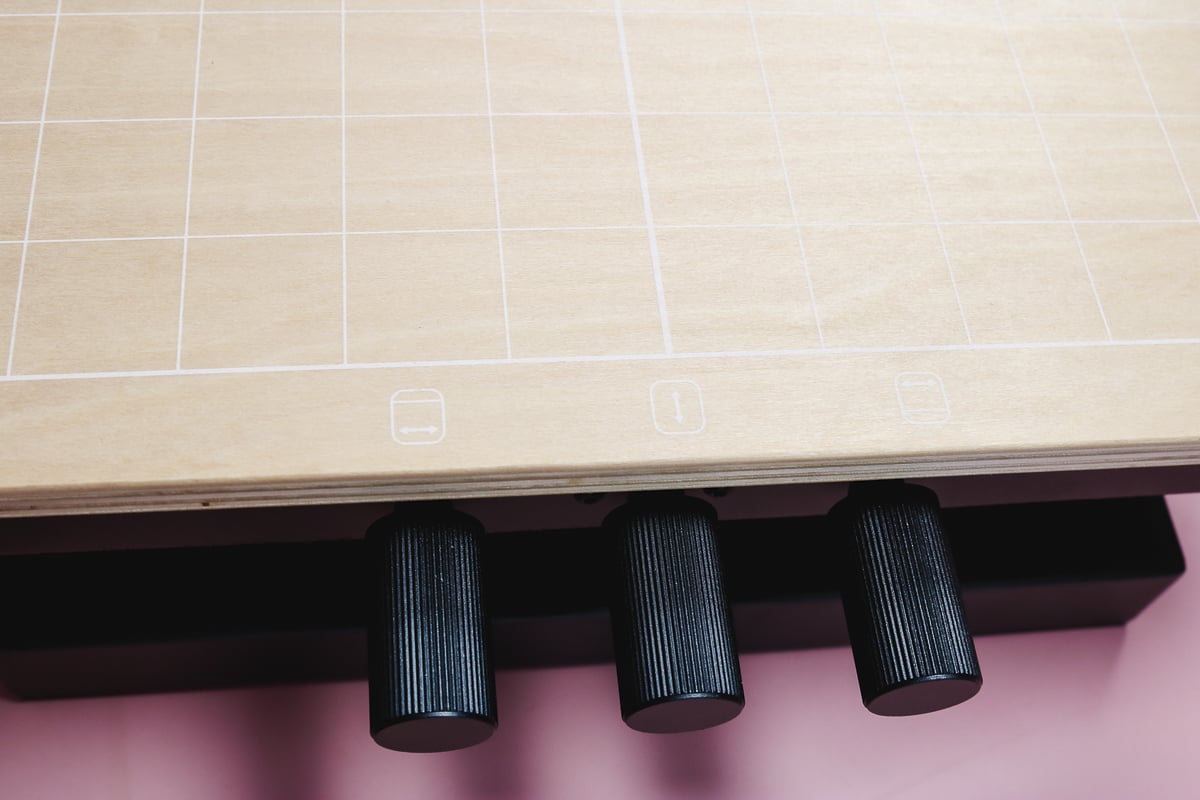
The Screen Printer does have some assembly. First, you need to add the knob to the side and then add the wood board.
The board is magnetic. On the back of the board, you’ll see locating brackets and then on the screen printer, there are coordinating pins. Line those up and then the board will snap into place because it is magnetic.
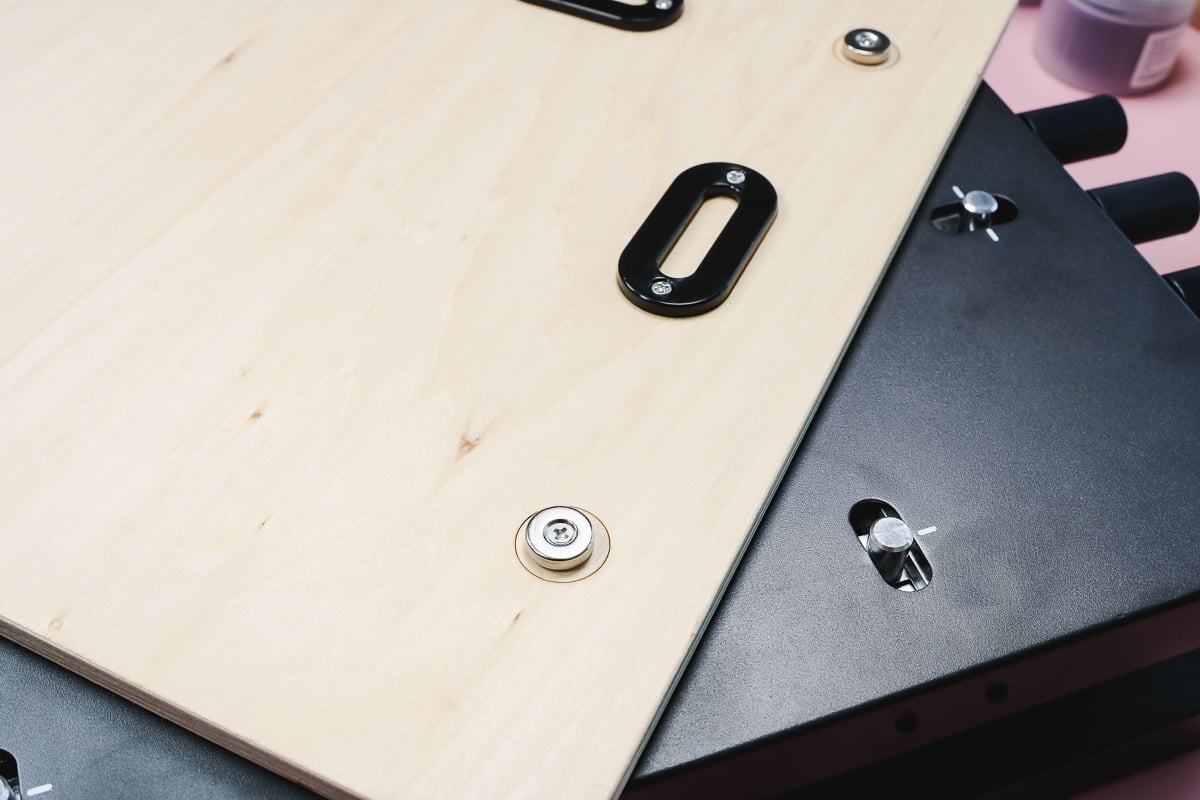
Once all of those are aligned, the board is not going anywhere. You shouldn’t be able to move this around at all.
There’s a line on the board itself with a corresponding line on the screen printer. Those should line up. So that’s one way to line the board up.
On the other end, there are three knobs. On the board, you’ll see some directional arrows. The center knob moves the entire thing in and out. The knobs on either side move the whole base from side to side.
Depending on the project you’re making, you may need to move the board so the design is where you want it on your blank. Because I am making a shirt today I am leaving it centered.
Step 2. Add the Screen to the Screen Printer
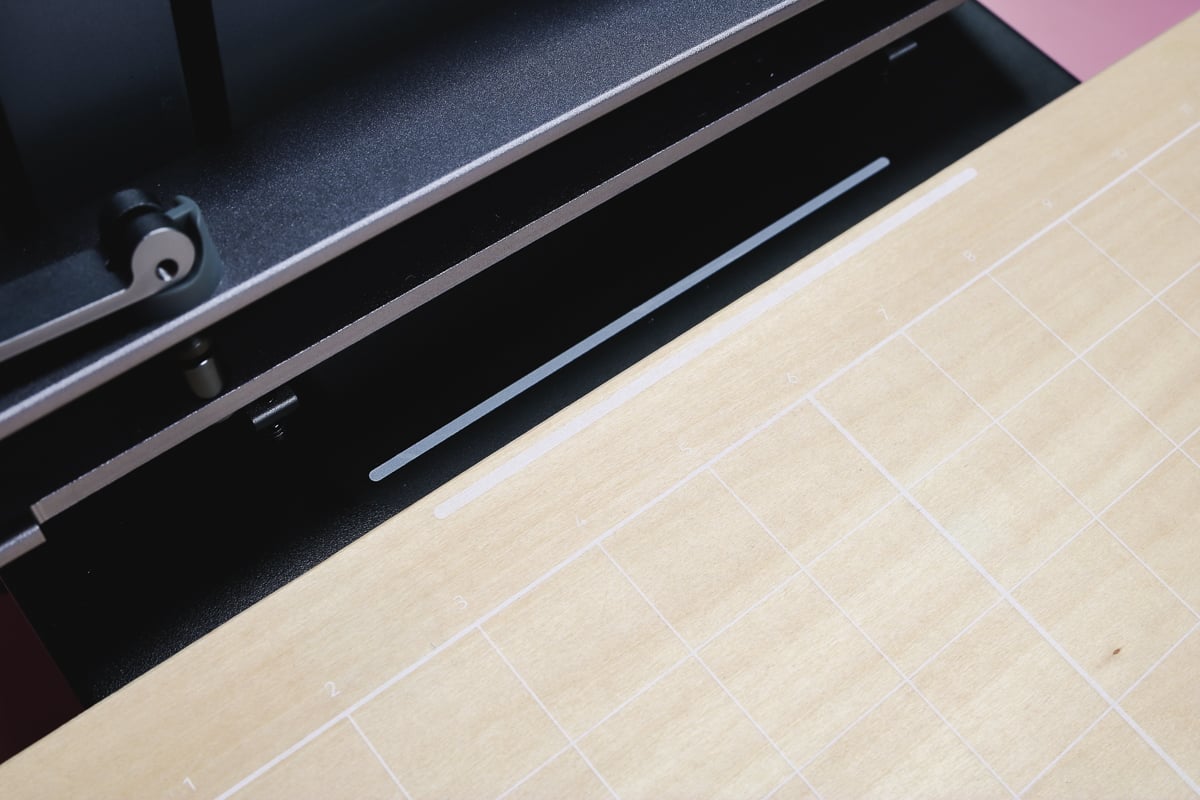
On the other end of the xTool Screen Printer, there is a slot to add the screen frame and on one end there is a knob.
This knob goes up and down and adjusts where the screen will sit.
I prefer to make adjustments without the screen in place. When you loosen the knob the bracket can pop up aggressively. I recommend holding it with your hand to keep it from moving too much.
By tightening the knob you can lock the bracket into place anywhere along those grooves. Because I am doing a shirt and it is not very thick I am going to move it toward the bottom, closer to the base.
To add the screen we’re going to use the same notched area that locates the screen in the laser to locate it on the screen printer. When the screen is in place, close the clamps. You may need to press down slightly for the clamps to close.
With the screen in place, I like to check the height again. Place your blank on the bottom of the screen printer and then make any adjustments to the height if needed. I really like that I can adjust the height of the screen exactly where I need it.
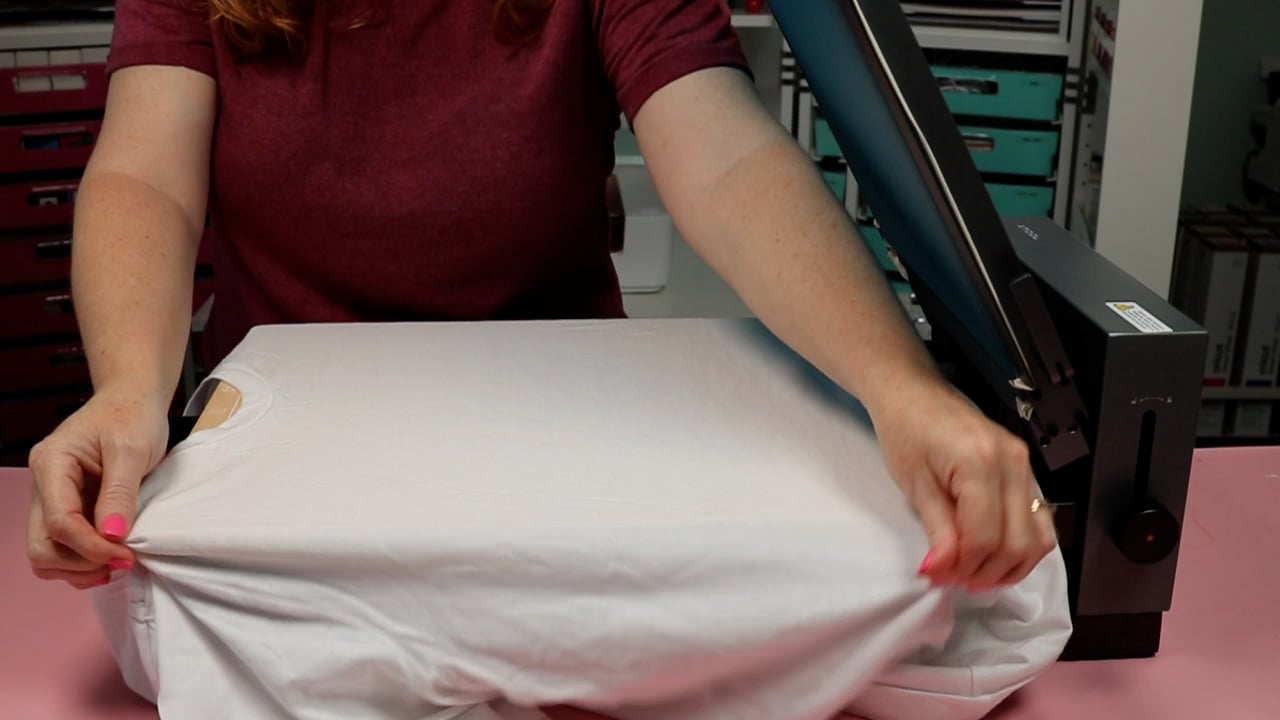
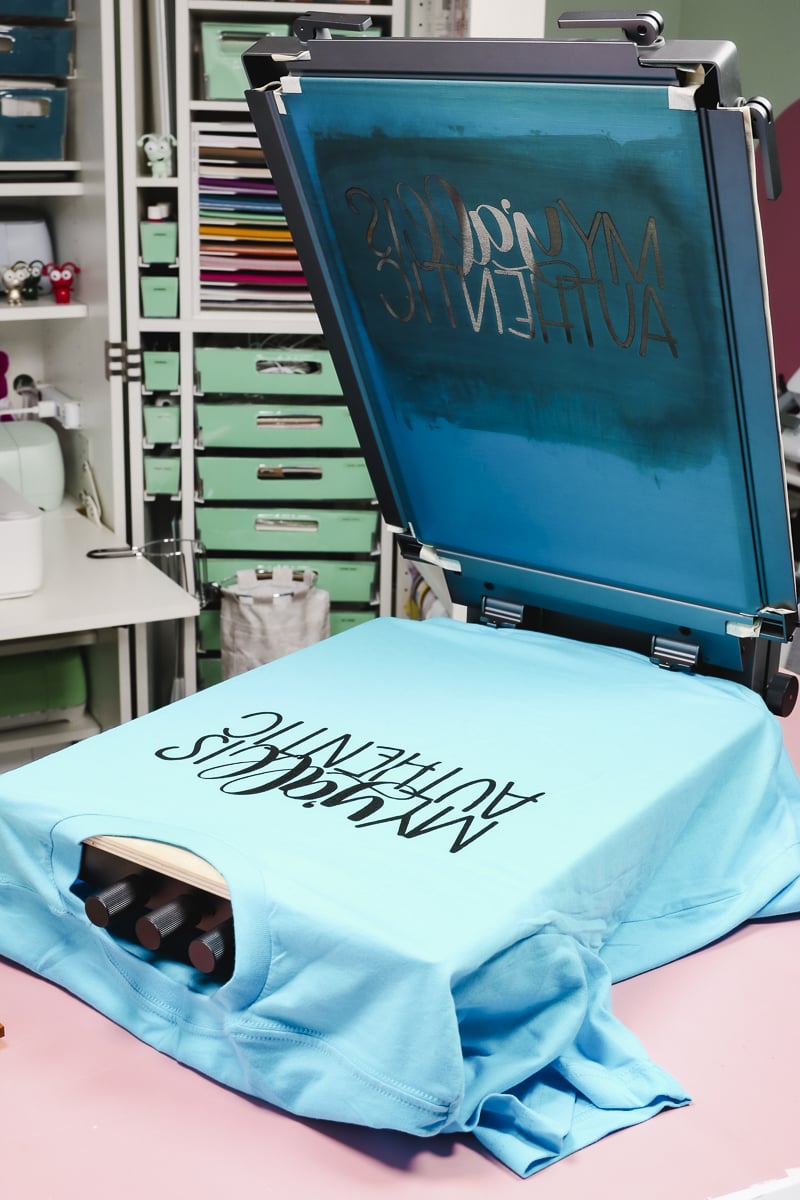
Step 3. Add the Shirt to the xTool Screen Printer
I like to thread my shirt onto the screen printer. Separate the shirt so only the front of the shirt is on the top of the board.
The board has guidelines on it that you can use to help line up the blanks. Remember, when I created my screen design I placed the design about 2 inches down on the screen. This allows me to line the collar up with the bar and the placement is in the right place.
Make sure there are no wrinkles in the blank. Move the bottom of the shirt so it’s not blocking the brackets and preventing the screen from coming down all the way.
Step 4. Add Screen Print Ink to the Screen
With the shirt in place, we’re ready to prime the screen.
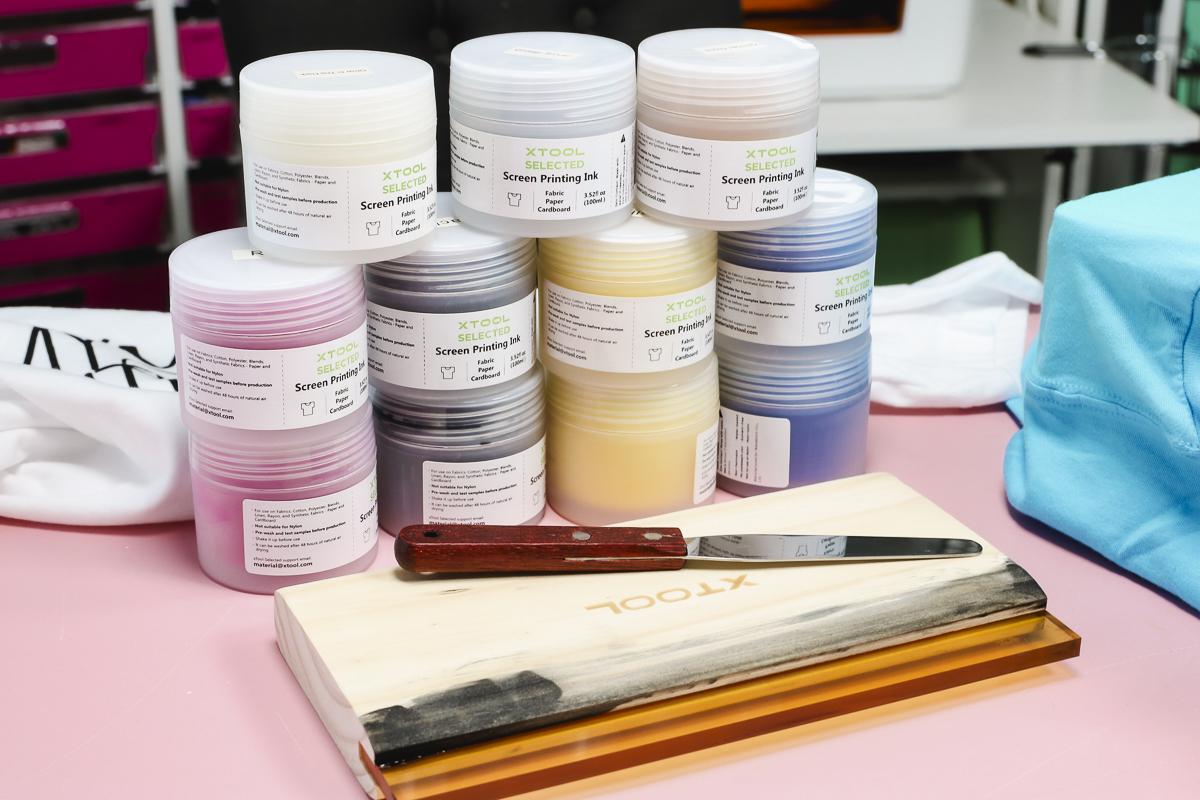
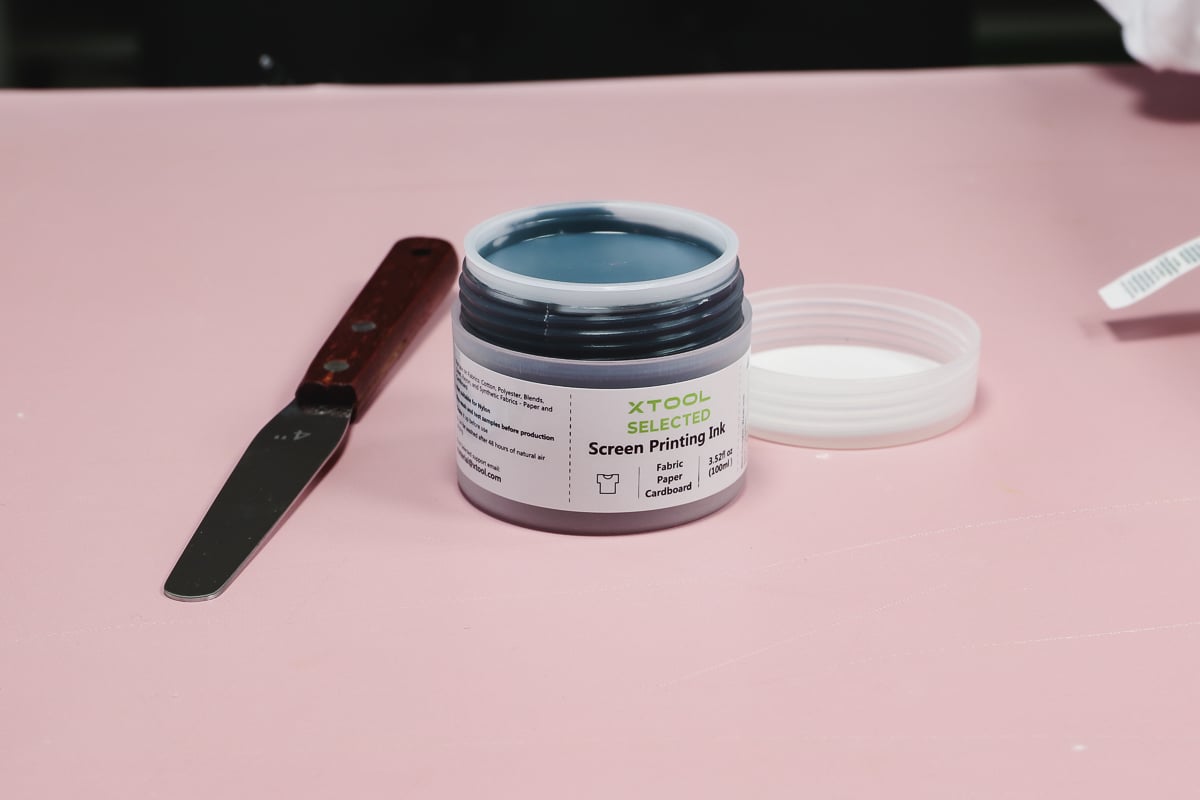
The xTool Screen Print kit comes with everything you need to create screen print projects. I am using black screenprint ink but the kit comes with two jars of black, blue, red, and yellow ink, one jar of glitter silver and glitter gold, and a jar of glow-in-the-dark ink.
Remove the cap and use the spatula that comes with the kit to stir the ink.
To prime the screen, I closed the screen print kit about halfway and added a row of ink to the screen below the design.
The kid includes a squeegee that has a magnet that will hold it in place on the screen frame. Use the squeegee to pull the ink across the design to get it ready to add to the shirt.
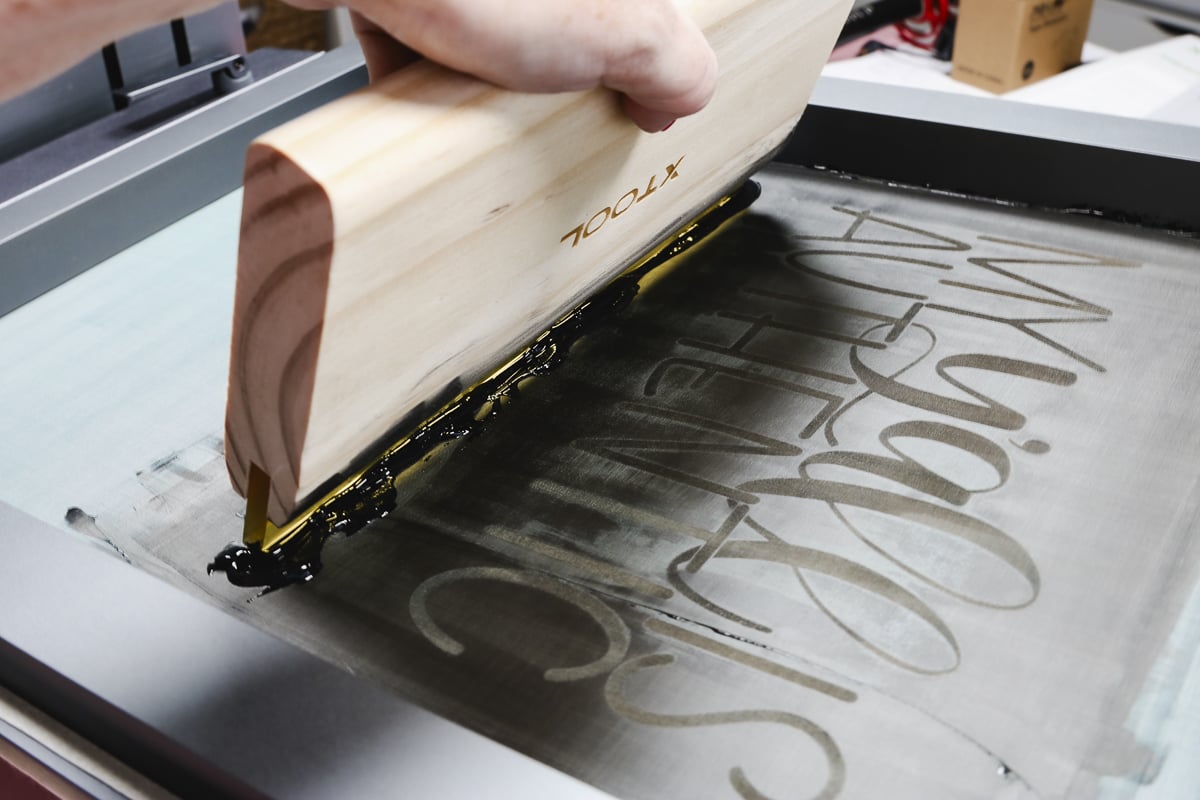
Remember, the ink will not go through the screen except where the design has been burned with the laser.
Now we’re ready to add the screen print ink to the shirt!
Step 5. Use Screen Print Ink to Add Design to the Shirt
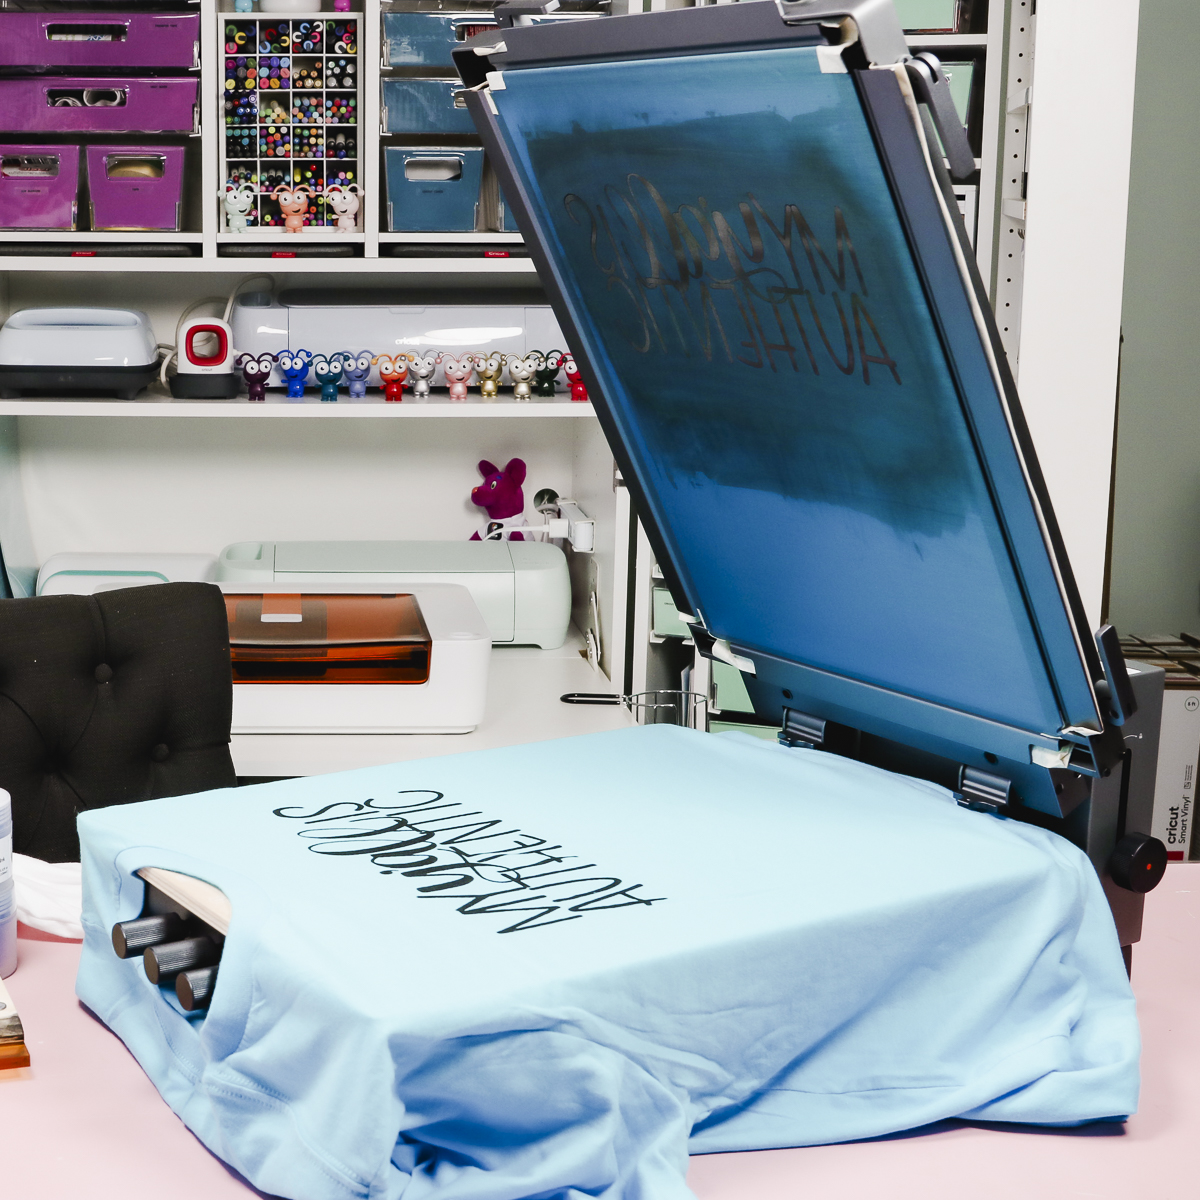
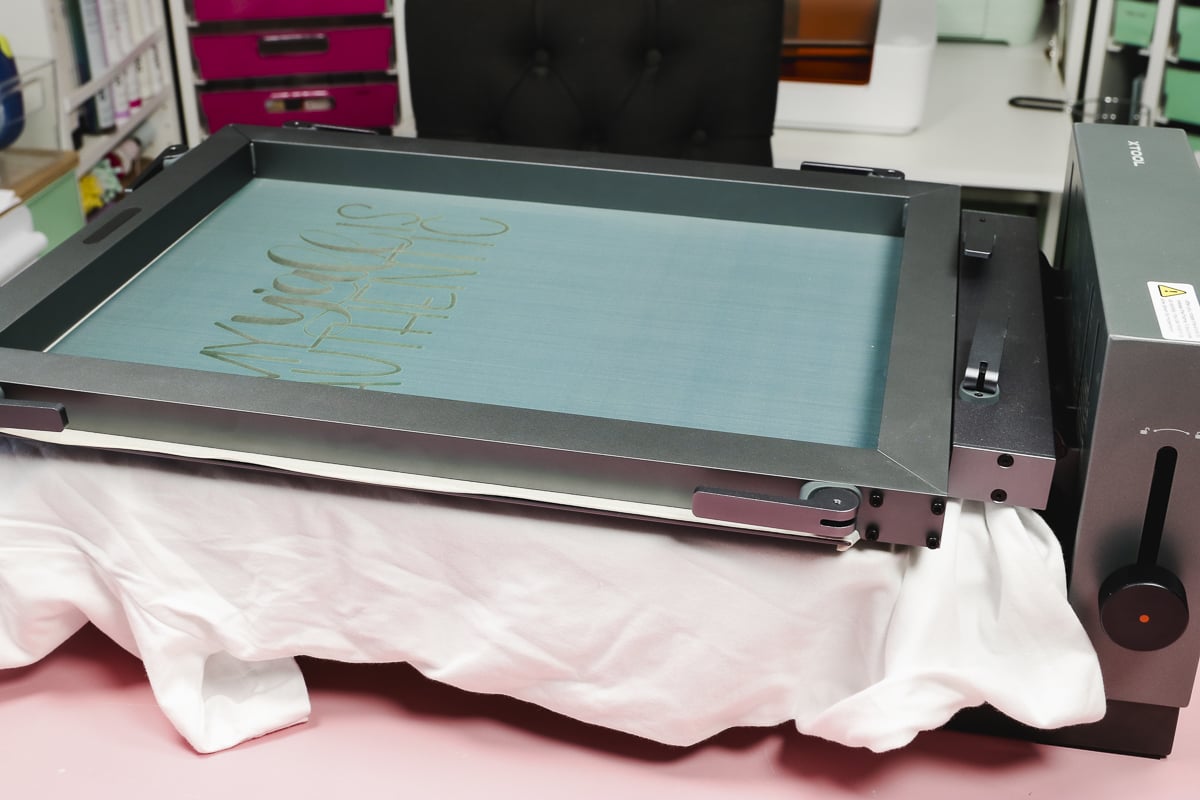
With the screen primed we’re ready to screen print our shirts. Press the screen all the way down on the shirt and then add more ink to the screen below the design.
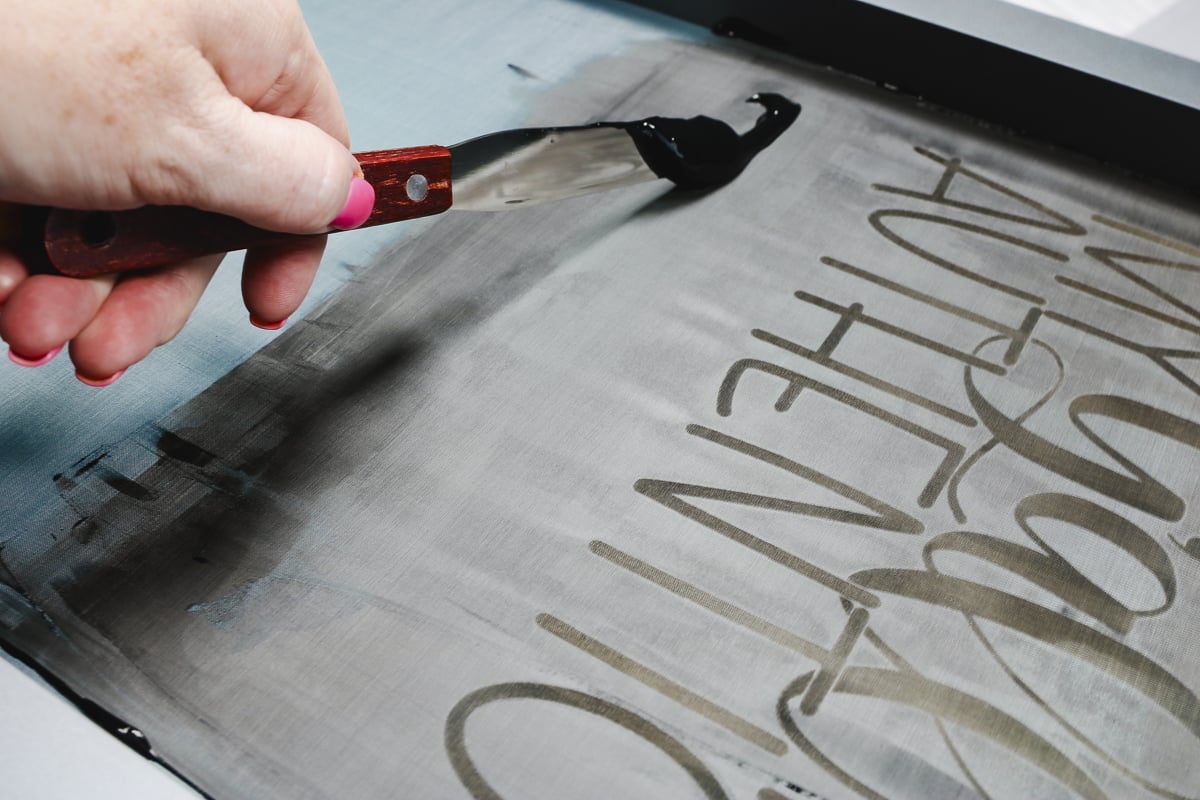
Hold the squeegee at a 45-degree angle and drag the ink across the entire design. The size of your design will determine how many times you need to swipe the ink across the screen. You want to make sure the whole design gets covered with ink.
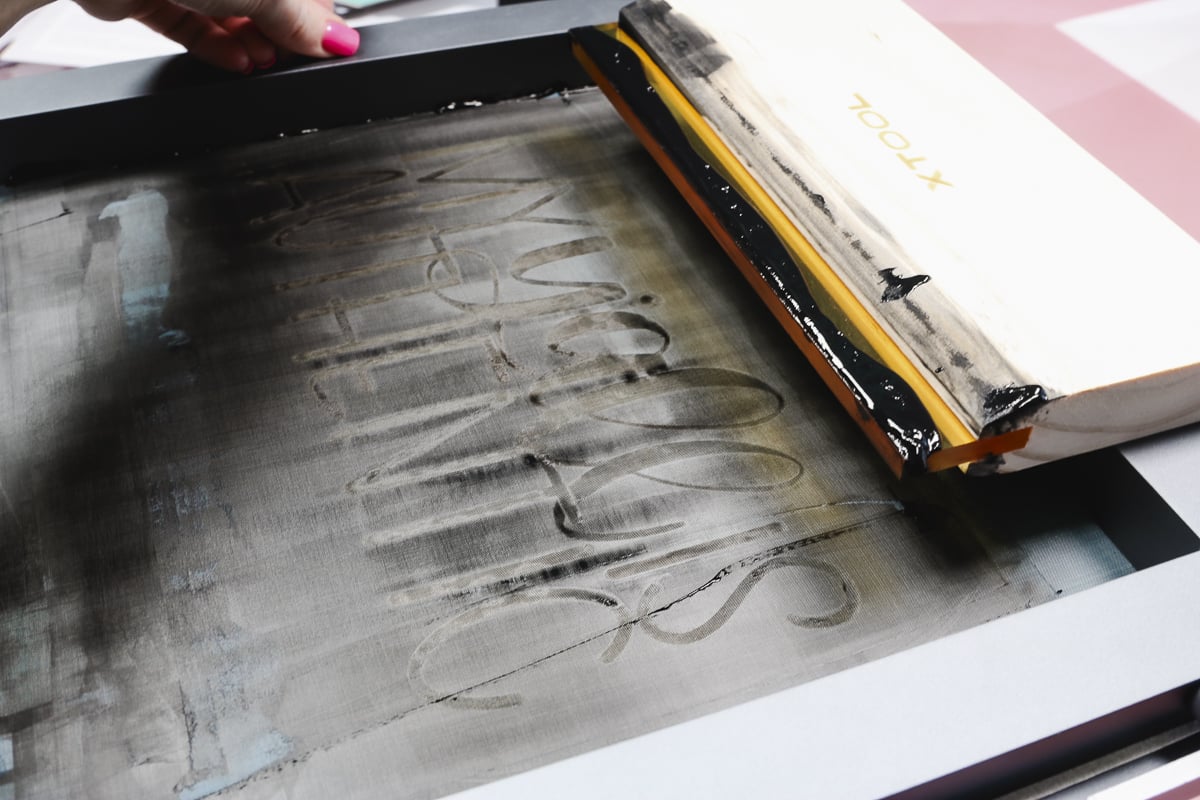
With the ink spread evenly across the screen lift the screen and check the results.

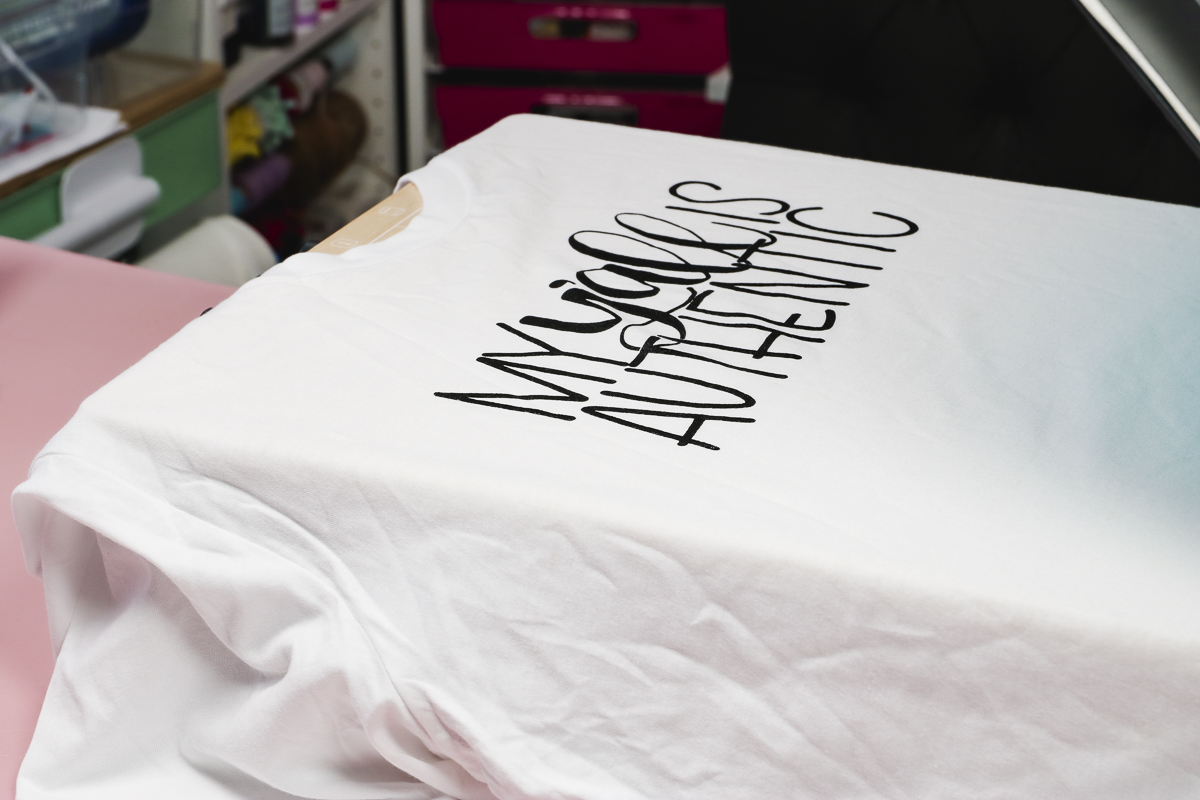
My results turned out beautiful. I don’t need to go over it any additional times.

Isn’t that beautiful? I am so impressed with how this turned out.
Step 6. Repeat the Process as Many Times as Needed
With the shirt finished, remove it from the xTool Screen Printer and set it aside to dry. Follow the directions for your ink to make sure you allow it to dry as long as is recommended. You also need to heat set the ink to make it permanent.
With the first shirt finished ,you can use the same screen to create as many projects as you want. I had amazing results with each additional shirt I made with this design.
Step 7. Clean Screen Print for Future Use
When you’re done with the projects you’re making, you can use water to clean the screen. With the screen clean, you can use it over and over again to make as many projects as you want.
I like to clean my screens at my kitchen sink using the sprayer. It makes clean up simple and allows you to get ink out of the screen grid.
After you laser burn the screen it is 100% permanent. That design will always be on that screen.
There are other accessories included with the xTool Screen Printer that you’re going to love.
Adhesive Mat
There is an adhesive mat that you can use to hold smaller blanks in place during the screen printing process.
The mat has an adhesive on both sides. One side will stick to the wood panel and the other side will be face up so you can stick your blank to it. This will hold the blank in place as you drag the ink across it.
This is perfect for small blanks and also holding shirts still if you will need multiple passes of ink or or using several colors.
Stickers
You’ll also find stickers included that you can use to label the placement of blanks. If you’re using a small blank and want to remember the exact location, you can use these stickers to mark where the correct placement is.
You can order additional supplies for the xTool Screen Printer on the xTool site including frames, screens, more paint, etc.
How to Store Screens
I recommend storing the screen printing screens in the frames whenever possible. Keeping them in the frame will keep it nice and tight and located correctly.
If you are using screens that are for a multi-layered design it may be difficult to get them lined up correctly again if you remove them from the frames.
My kit came with four screen frames. I think it’s possible to get a lot of projects done with the supplies that come with the kit.
I am so happy with the xTool Screen Printer. Hands down this was the easiest screen printing experience I’ve ever had.
What makes it the best experience? It was very easy to put the screen in the frame. The laser does all the work for creating the design. Locating the design is easy and I am a fan of all the guides on the wood base to help make sure things are lined up correctly.
You do not have to use the xTool Screen Printer inks. If you’re a fan of other inks, you can use those with these screens as well.
Because of how the hinge works on the screen printer you can adjust the height and add items that are as thin as a piece of paper or as thick as a book or box.
I really think you’ll be happy with the xTool Screen Printer. I don’t have a lot of screen printing tutorials, but my friend Jennifer over at Pigskin and Pigtails does and she screen prints all kinds of things. So you can see a variety on her YouTube channel.
I hope I’ve answered any questions you have about the xTool Screen Printer. If you have any additional questions leave them in the comments and I’ll be happy to answer them for you.