
This post and photos may contain Amazon or other affiliate links. If you purchase something through any link, I may receive a small commission at no extra charge to you. Any supplies used may be given to me free of charge, however, all projects and opinions are my own.
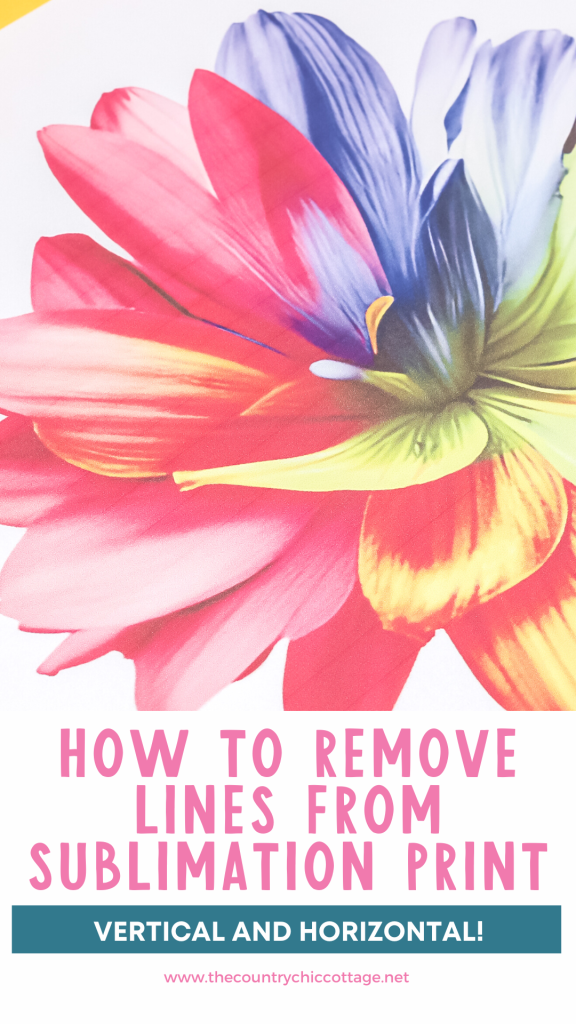
Are you dealing with lines in your sublimation print? I know exactly how frustrating that can be so I’m here to help! Today I am going to teach you how to fix lines in sublimation prints – both vertical and horizontal lines!
In this post, I will specifically talk about a converted Epson EcoTank because I feel like lines are most common with that printer. These tips can help with other printers as well and I’ll cover that toward the end of the post.
If you’re trying to decide which sublimation printer is right for you, check out my post on how to choose the right Sublimation printer for your crafts.
What are Lines in Prints
Lines in a sublimation print can be horizontal or vertical. Typically I see horizontal lines and that is what I’ll be discussing primarily today. Lines will show up on your print but will be even more obvious after pressing.
The lines can be caused by a couple of things but the most common cause is the print settings. Printhead alignment and clogs are other possible reasons you may be getting lines so we’ll cover all of those as well.
You can watch me walk through all of the steps for fixing lines in your sublimation print by pressing play on the video below.
How to Adjust Printer Settings to Fix Lines
In my experience, the most common cause of horizontal lines in your sublimation print is your printer settings. With the Epson EcoTank that has been converted for sublimation, if you don’t have the printer settings correct you will not get a clean print, it’s just that simple.
So, how do we adjust the print settings to get rid of the lines?
To begin, you need to make sure you have the right driver for your printer. If you’re not seeing Print Settings in your printer dialog box, you will need to go to the Epson website and find the right driver for your printer and install it on your computer.
So let’s take a look at those print settings and how they might affect your final print so you know what to do when you see those results from the print that you’re getting from your printer.
With the right driver, you will see a Printer Settings option in the dialog box and there you will be able to change your paper setting, change the quality of your print, and change the speed your printer is printing.
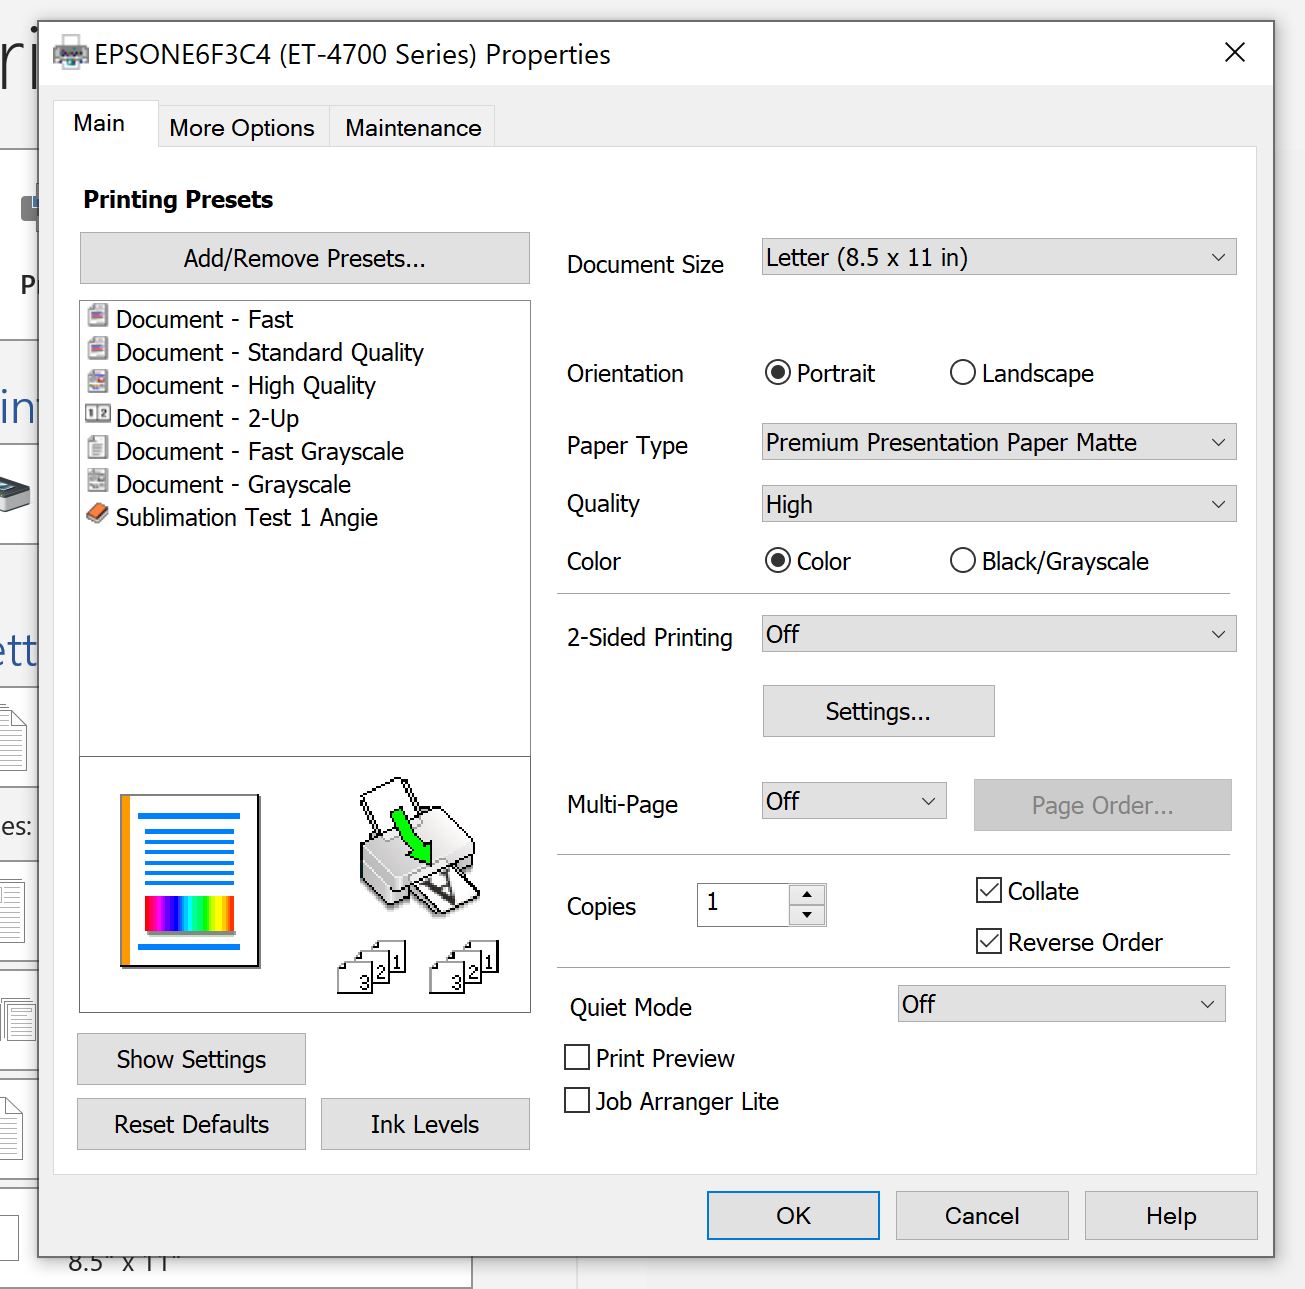
When you first set up your printer, the defaults will be set to Plain Paper, Standard Quality, and the High Speed will be on. I can almost guarantee if you were to print without changing those settings you will have lines in your print.
Want the flower I am printing in this post? You can get it for free here!

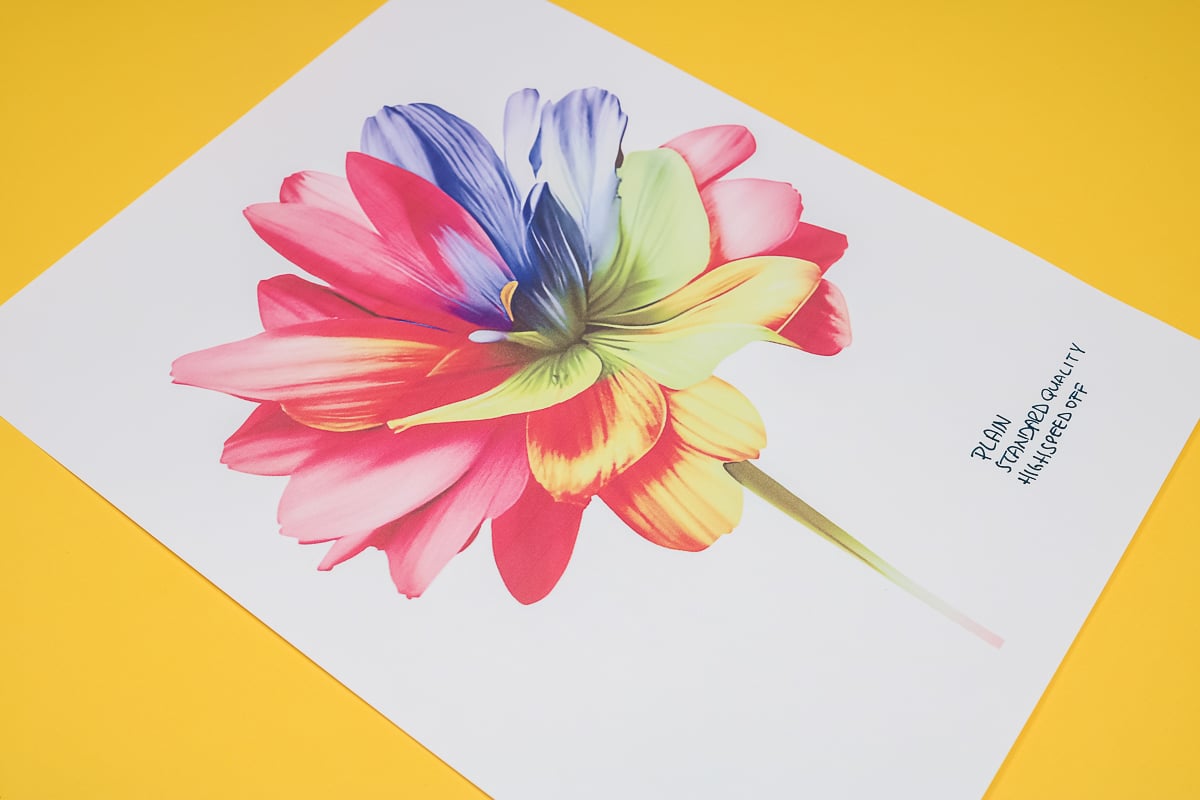
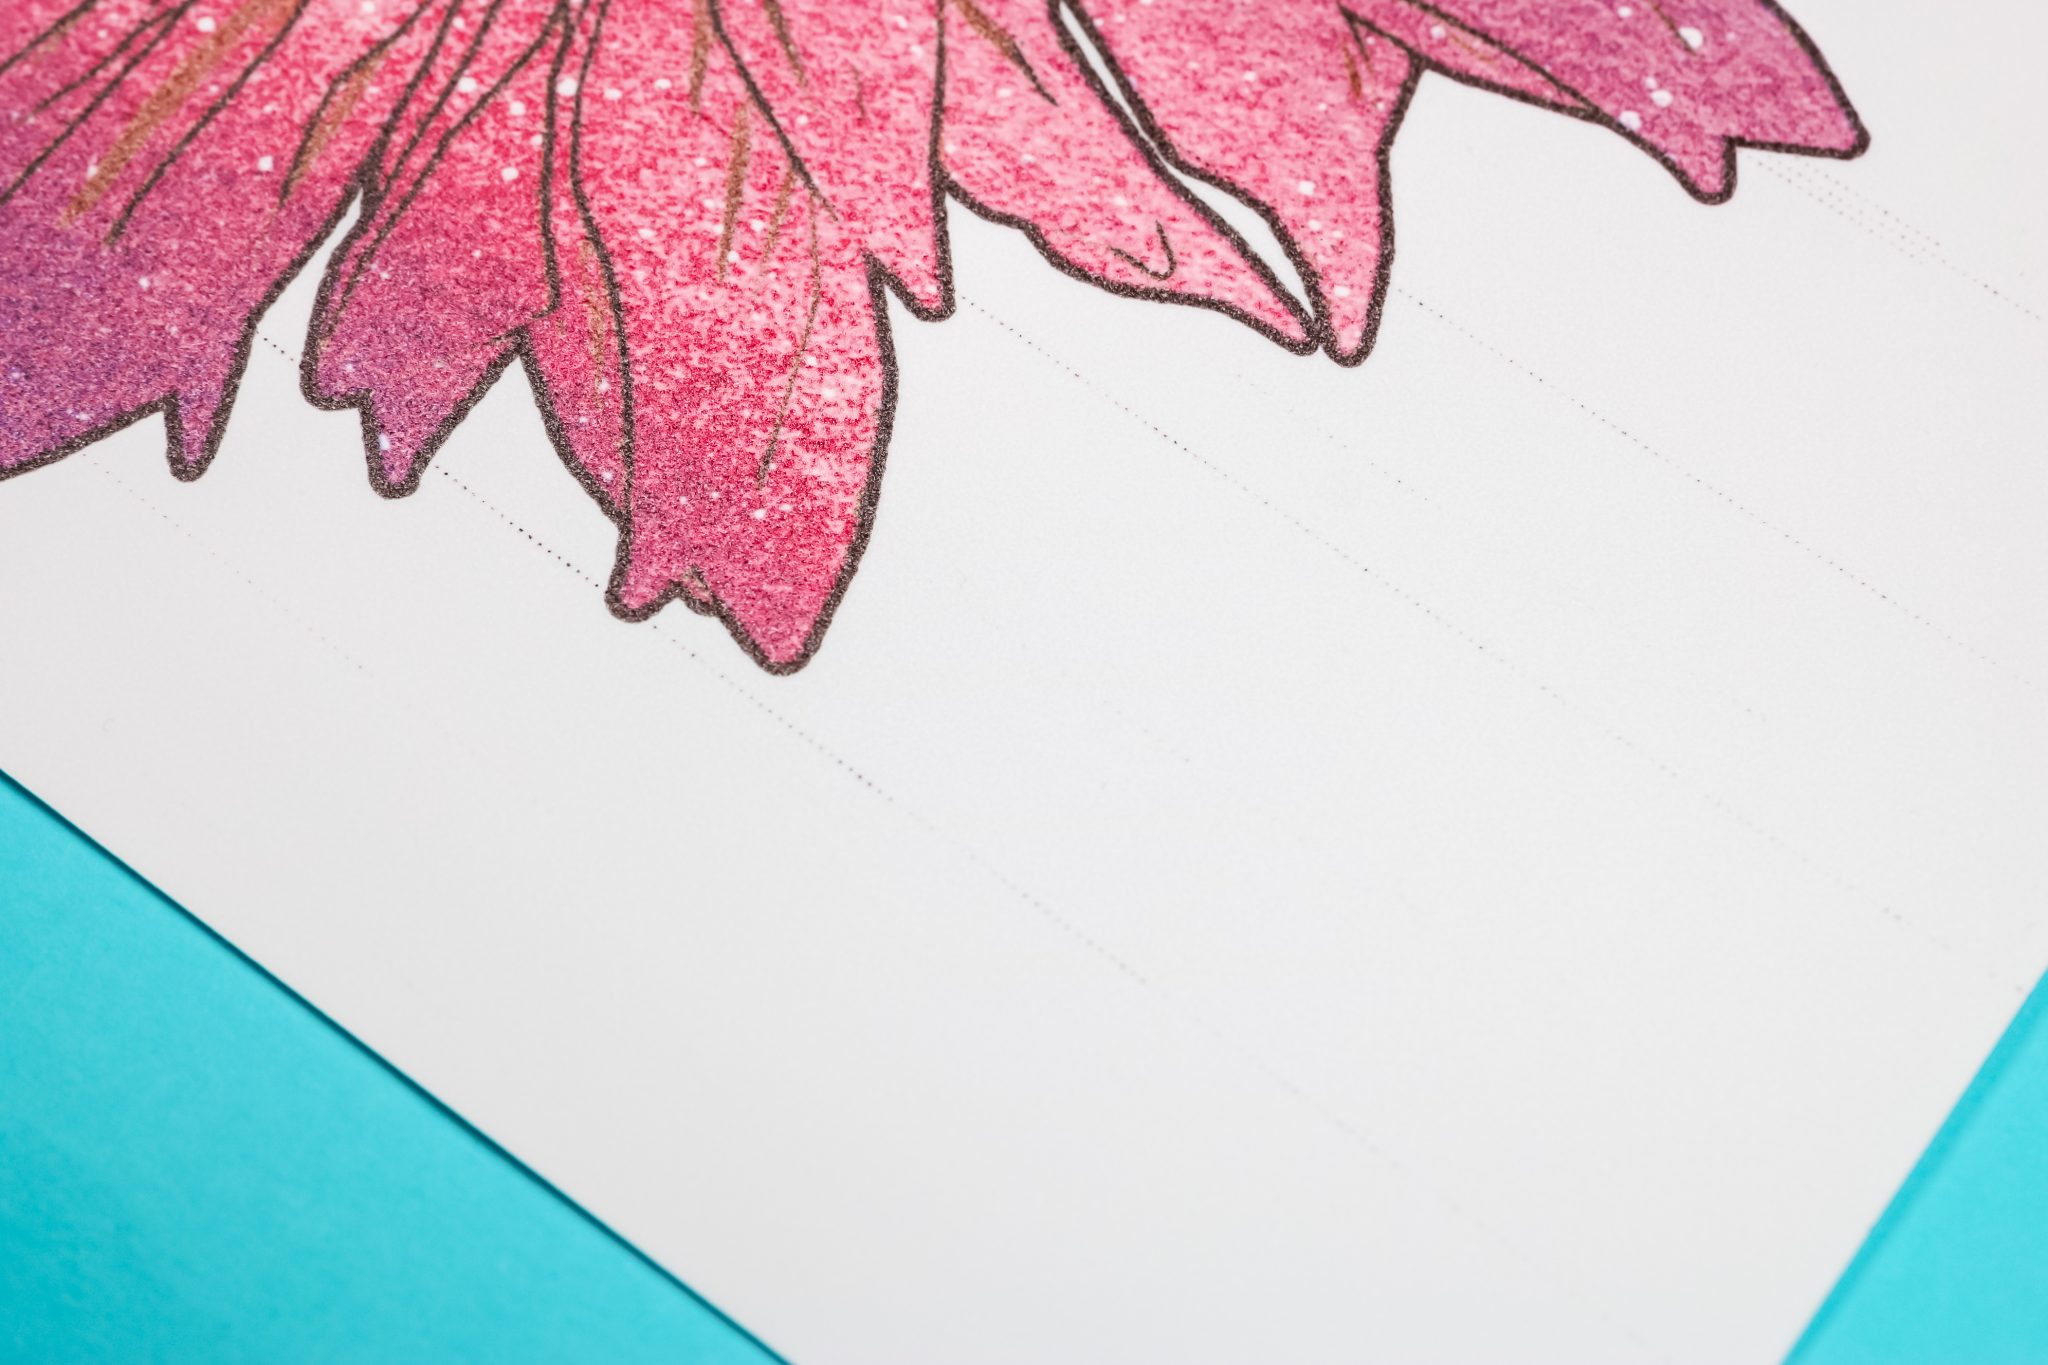
As you can see in the photo above, there are several horizontal lines, especially across the top of the flower. Those horizontal lines sometimes referred to as banding, will almost always show up with those default printer settings.
How to Change the Speed of Your Printer
So, what changes can we make to improve our print quality? The first change I would make is to turn off the high speed.
In this photo, the only thing I changed was turning off the high speed, which can also be listed as bidirectional. Make sure that is turned off.
As you can see there are still lines, there are fewer but they’re still there. This is just the printed version. If you were to press this onto cloth, those lines would definitely show up.
How to Change Print Quality Settings
Now that we have high speed turned off, the next step is to change the print quality settings.
Keeping high speed turned off, I am going to change the print quality from Standard Quality to High Quality. I kept the paper setting as Plain Paper and made sure High Speed was turned off.
How to Change Paper Settings to Fix Lines in Sublimation Prints
I am going to take this one step further and change the paper setting as well. Although the previous print looks really good, I want to get the best print possible. The paper setting can have a big impact on your prints as well as your final project.
The Plain Paper setting is going to lay down the least amount of ink of all the paper settings. The next step up is the Matte Paper Setting and the most ink will be the Glossy Paper Setting.
Be aware, you can get too much ink on your print. If you’re having trouble with blowout around your print – something like lines around your print or red around your black, you may have too much ink down on your paper.
Using Matte Paper Setting
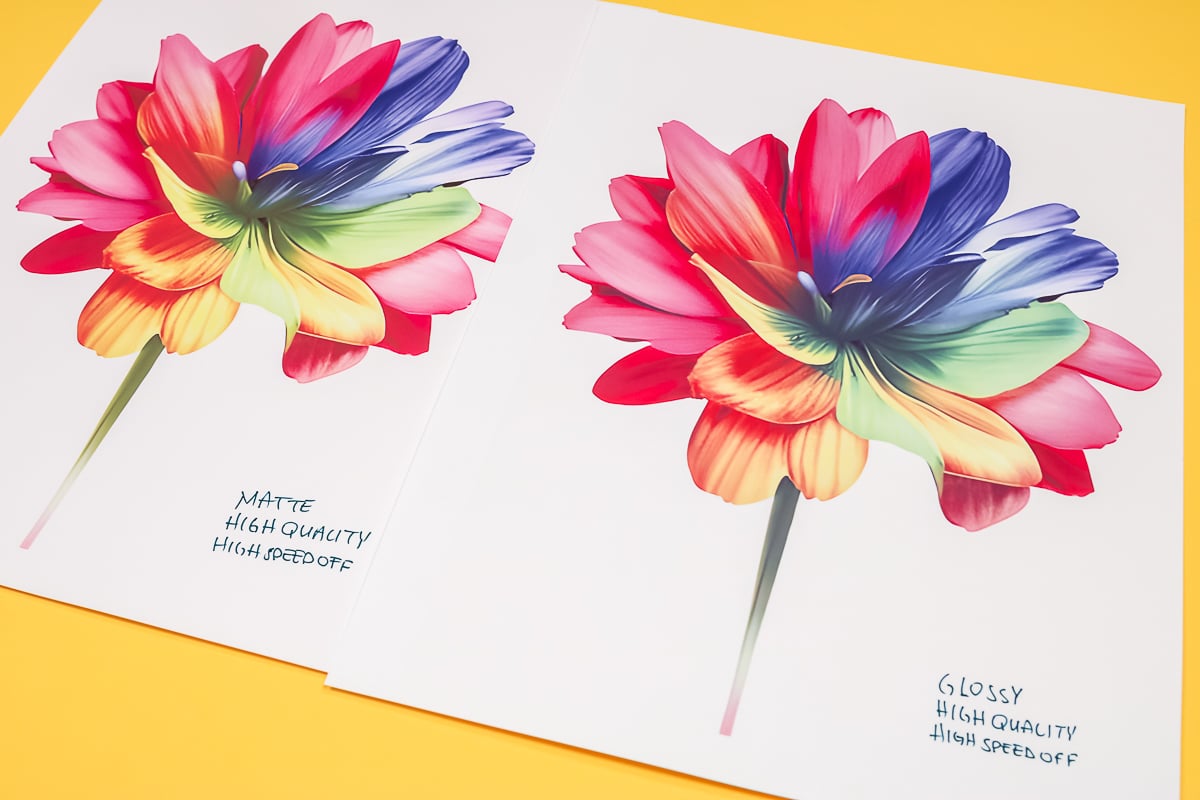
The Matte Paper setting is the setting I use most often. I usually use the Premium Presentation Matte setting but I haven’t seen a ton of difference. You can choose anyone that are matte.
Keep the print setting on High Quality and High Speed off. This is what I almost always use for my projects. NOTE: This setup works really, really well, especially for fabric projects.
Look at how beautiful that print is. You can see in the comparison photo above the only thing I changed was the paper setting. Simply changing the paper setting to Matte gives a vibrant line-less print that will be beautiful when applied to the fabric.
Using Standard Quality Print Settings with Matte Paper Settings
If you’re using my favorite settings but feel like it’s too much ink for a rigid surface, what should you do?
I would recommend keeping the paper setting Matte and changing the print quality setting to Standard Quality. Make sure that High Speed is still off and you should have a print that is perfect for sublimating on a rigid surface.

As you can see in the photo above both prints look great. The only difference between the two is the Print Quality setting. One is High Quality and the other is Standard Quality.
There are no lines on either print but the High Quality version is going to have more ink in the paper than the Standard Quality version. As you’re learning sublimation, you may find that you need one paper setting for fabric surfaces and a different one for rigid surfaces.
When to Use Glossy Paper Settings
Now that you’ve seen how beautifully the Matte Paper setting prints, you might be wondering when you should use the Glossy Paper setting.
I am almost always happy with the Matte Paper setting. If you feel like you’re not getting the vibrant end result you’re looking for, I would try the Glossy Paper setting.
The Glossy Paper setting lays down more ink on the paper than the Plain Paper setting and the Matte Paper setting. It’s hard to tell on the paper itself but you’ll likely see a difference after pressing.
Any Glossy Paper setting will work. Make sure you have the print setting as High Quality and High Speed is off. You shouldn’t see any lines or banding with this setting.
Adjusting Print Head Alignment
Now, let’s say you’ve adjusted all your settings and are still seeing horizontal lines across your print. What could be causing this?
The next thing I would do is to check the print head alignment. This is easy to do on the EcoTank printers. It’s right in the maintenance section of the printer and you can find it right on the screen on your printer.
On the screen, pick maintenance and then print head alignment. You can choose either a vertical alignment or a horizontal alignment.
I recommend doing both. You can see what each sheet looks like in the photo below.
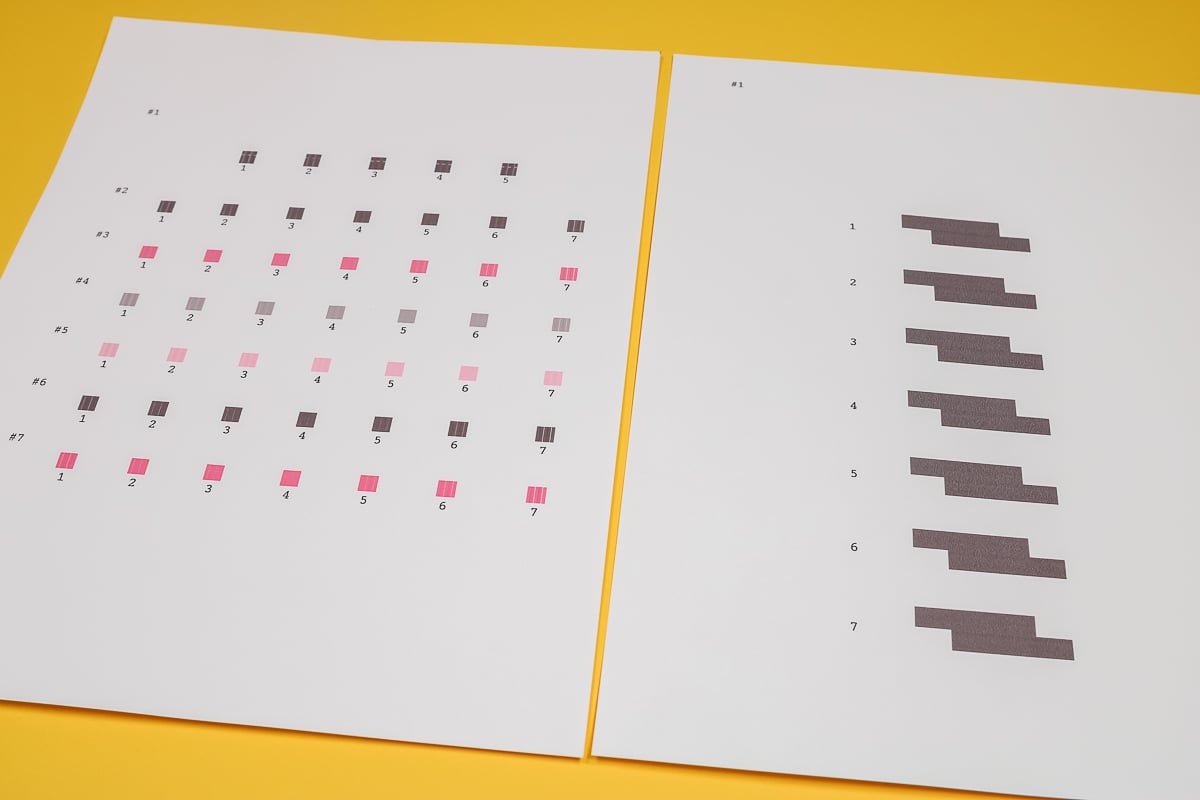
The vertical alignment sheet will have a series of boxes. On the screen, it will ask you to select the box that has the fewest amount of lines. You’ll input the numbers right on the screen of your printer. It’s a very easy process to do.
After the vertical alignment is done, I would recommend doing a horizontal alignment.
In this case, you choose the box that doesn’t overlap or have a separation. Choosing the correct boxes will give you a perfect printhead alignment. Once you have those picked, your printhead lines are aligned.
With that done, I would try to print your print again, making sure all the settings are correct, and see if the banding has gone away.
How to Check for Clogs in Sublimation Printers
If you’re still seeing lines, it’s time to check for a clog. I actually have a whole post on how to check for and fix clogs in an Epson EcoTank so I won’t go into this in detail but you’ll begin by printing a nozzle check page.
A nozzle check page will show you if there are any clogs in your printer. Clogs can cause horizontal banding. We don’t want to assume nozzles are clogged if we’re seeing banding so don’t do this until you’ve checked your print settings.
If you’re having horizontal banding and it’s not your settings or printhead alignment, it’s likely a clog. A small clog can cause some horizontal lines on your print.
How to Fix Vertical Lines in Sublimation Prints
If the lines you’re dealing with are vertical, not horizontal these are called roller marks. I commonly get them if I try to print EasySubli on my Epson EcoTank. I cannot successfully print on EasySubli.
Vertical lines, or roller marks, happen when the ink is still wet as the paper moves through the printer. The Epson EcoTank printers have small rollers on the inside and if the ink is wet as they move over the ink it can transfer across the page.
It’s possible you could get similar vertical lines with the Epson F170 as well. It’s not as common or as bad but be aware it could happen.
To solve this problem let’s begin by checking what you’re printing on.
Are you using a sublimation paper? Is that paper rated for use with an Epson EcoTank printer? Do you have another brand of sublimation paper you could try?
Check all of those things to see if that solves the problem. If it doesn’t you can also try changing the paper settings as we talked about before to lay down less ink on your paper.
When to Use the Envelope Setting
Another option you could try using the envelope setting. On most EcoTank printers, there is an envelope paper setting. The envelope setting pulls the rollers back a little bit and that may help with the vertical roller marks.
Paper settings can play a huge factor in vertical roller marks. What you’re printing on, how much ink you’re laying down, etc. Unfortunately, sometimes you just can’t get rid of the vertical roller marks.
For example, I am unable to print on Siser EasySubli on my Epson EcoTank printer. It is something that just does not work for me. If that’s the case for you, try printing on regular sublimation paper. If printing on regular sublimation paper doesn’t show roller marks, it’s more than likely the paper you’re using that is the problem.
Can a Design Cause Roller Marks?
Sometimes a design can be the cause of roller marks. If you have a design that has a lot of ink in one spot, like big chunky letters that are close together. There may be a lot of ink in that one spot, enough ink that it stays wet.
This is when we want to go back to the paper settings. A design with a lot of ink in one area may require a setting that lays down less ink than a design that doesn’t.
How to Fix Lines in Sublimation Prints from Sublimation Printers
So far we’ve talked about how to fix lines in sublimation prints from an Epson EcoTank printer. The Epson F170 and Sawgrass printers both have print settings that are fairly intuitive. You choose the type of surface that your design will go on.
With the F170, you can choose either a rigid paper setting or a textile paper setting. Those different settings will determine how much ink is laid down on the sublimation paper. With all the steps we went through to get the right settings for the EcoTank, you don’t have to do those with the F170.
The Sawgrass Print Manager is the same way. You send your print to the printer and choose what you’re putting it on. Sawgrass has a lot of different settings and it lays down different amounts of ink for each of those onto the paper.
When I get lines with my F170 or my Sawgrass, I check the printhead alignment.
With my Sawgrass specifically, I will print a printer purge file right within the Print Manager. The purge file will force the ink through and any small clogs are pushed through. That has solved the line problem for me with the Sawgrass 100% of the time.
Final Thoughts on How to Fix Lines in Sublimation Prints
Lines in sublimation prints can be really frustrating. By going through the steps laid out here, you can have line-free sublimation prints. Make sure the print heads are aligned, confirm your paper and print settings are correct, and do a nozzle check to check for any clogs.
These methods help fix lines in sublimation prints almost every time. As I mentioned above, you may find as I did with EasySubli, that there is a material you cannot print successfully on with an EcoTank.
I specifically walked through the Epson EcoTank because I have seen a lot of people choosing the wrong paper setting for a converted EcoTank. This can cause lines in prints but can be fixed pretty easily by adjusting your printer or paper settings.
I hope this has helped you fix lines in your sublimation prints. If you have any additional questions, leave them in the comments below and I’ll get those answered for you!